Saturday, April 30, 2011

threads, needles, and pins...and a surprise for us.

Hi, I'm Cindy from Live a Colorful Life, and I'm thrilled to be here, talking about
threads, needles and pins. 
I've been a quilter for over fifteen years, after going through many other creative phases. While I tired of the other phases after a while, quilting continues to inspire me, as it constantly changes and evolves. I started out as more of a traditional quilter, but now I would consider myself a modern quilter who likes to put a spin on some of the traditional blocks.

While my fabric choices and design ideas have changed into something entirely different from what I started doing as a beginning quilter, a few things have remained the same, and that is the high quality tools I use. This may not be the most exciting topic to read about but it's an important one: thread, needles and pins.
Volumes could be written about thread: types, brands, colors. As a beginning quilter, it is not necessary to have a multitude of thread colors. It IS important to have good quality thread.

These are spools of thread I inherited from my grandmother's sewing kit. I love them, the wooden spools and the colors. However, I would not use a single spool of this thread when piecing a quilt top. It's old, it could be brittle, and I just wouldn't trust it.
These are from Connecting Threads. They carry good quality thread at a very reasonable price.
What I recommend is a good 50-weight cotton in a couple of neutral colors, because they are subtle and blend well. I have a "wardrobe" of neutral colors, ranging from white to black. Start with a couple of neutral colors, and add more colors as your budget allows.
The numbers on thread label can be a little confusing. The lower the number, the heavier the thread. In other words, if it takes 50 kilometers of thread to to weigh one kilogram, it will be labeled 50 wt., if it takes 40 kilometers of thread to weight one kilogram, it will be labeled 40 wt. If your brain isn't used to the metric system, never fear. Just remember that a 50 wt. is a good standard thread to use when piecing.

There is often a number after the weight, either a 2 or a 3. This refers to the number of plies. Connecting Threads is a size 50/3 (50 weight, 3 ply), while Superior is 50/2 (50 weight, 2 ply). Both are excellent threads for piecing your quilt top together. Other brands to consider are Aurifil and Gutermann.

While I'm on the topic of thread, it is actually a myth that using polyester thread will tear your fabric. Fabric tearing due to thread has nothing to do with the thread fiber type but rather with the strength of the fibers--both the thread and the fabric. Whichever is the strongest is going to win the battle. However, remember that cotton thread is still a better choice for piecing because it is more heat tolerant and iron-safe. You don't want to be pressing those seams and risk having your thread melt!

If you want to learn more about thread (and I do admit to being a bit of a thread nerd), Superior Threads has a lot of "threadology" information and an excellent chart with guidelines on matching up bobbin thread, needle size, etc.

The bottom line is that a high-quality cotton thread will make the best seam, which just helps everything to match up better.
Now that you have your thread, what kind of needles are you going to use in your machine?

Here again, it's a numbers game. When it comes to needles, the higher the number, the stronger the needle and the heavier thread it can handle. And it's confusing because, again, there is a two-number system. The higher number is a metric measurement of the needle shaft diameter, and the smaller number is the U.S. equivalent of the needle shaft diameter. So a 80/12 would be a finer needle than a 90/14. I started out using a Universal 75/11 but now I am using either a microtex sharp 80/12 or a topstitch 80/12. You don't want to use a ball point needle, which was designed for polyester fabrics, but rather a sharp needle designed for woven fabrics. AND CHANGE THAT NEEDLE EVERY TIME YOU START A NEW PROJECT!
On to pins. My favorite pins are #5004 IBC Fine Silk Pins by Clotilde (or #5003 IBC if you like a pin with a glass head). You want a pin that is strong, long, thin, and very sharp.
As you start learning more quilting techniques and read about how other quilters do things, you will find that some people pin and some don't. I tend to pin a lot and find that the little extra time it takes is definitely worthwhile. First I determine whether I'm going to press the seams to the side or press the seams open. When I first started quilting I always pressed to the side. Now, with very few exceptions, I press my seams open because I feel that it makes the block less bumpy.

Either way, with the seams pressed open or to the side, first line up the seam:
Then place your pin about 1/8" away from the seam.
The back of your block will look like the one on the left if you have pressed your seams to the side, or like the one on the right if you have pressed them open.
Either way, the block intersection will look great!
Thanks for having me, Rebecca! Have a great time in Quilt Class, and I hope you all will stop by to see me at Live a Colorful Life.

Oh Thank you Cindy! She is a wealth of knowledge, provides tons of inspiration and has become a close bloggy friend. Thank you for visiting today... 
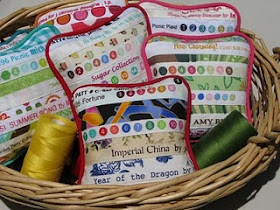
Cindy also has a surprise for us... Have you seen these...
 Gorgeous Selvage Pincushions!!
She made one for our Class!!
Pop on over to her blog to win it!
She custom designed this pressie for me....
and I was so excited when it arrived in the mail yesterday..

 
  and if you don't win... she can custom design one for
YOU!!
Thank you sooo much Cindy xx I just LOVE it!

Wednesday, April 27, 2011

Quilt Class 101 - Week 4 - Sewing

Week 4 - Sewing

There are endless items to buy and info to read when it comes to sewing supplies. However, with Quilting, there are set items that I use over and over...
First, you need a Sewing Machine.
My Sewing Machine is a Bernina Aurora 440 QE. I absolutely LOVE it. Its a work horse. Its a Quilting machine, so it came with all the right attachments for Quilting. But, it will also sew anything. Zippers, Button holes, Lettering, everything I can basically think of.  I previously had a Brother Quilter Edition that worked great. It also came with all the Quilting things i needed to get me Quilting, but it was just a cheaper machine and couldn't quite cope with the hours and hours of sewing I was doing.

 How to choose a sewing machine??
If your hunting around and making your first purchase.. there are a few things you should consider..
1- What am I going to be sewing?
2-  How much sewing am I going to be doing?
3-  Whats your budget?
4-  Are you a beginner or experienced?
5-  Try and buy from your local sewing shop. I like to service my machine quite regularly. So its great i have a local shop to take it to.
The next step I would do... Is research. I found it really hard reading about sewing machines online. So I found the best thing to do is ASK QUESTIONS... Ask sewers at the local sewing shop? Or local Quilt Class? You can even try new machines to see which ones you like the feel of. Also, Ask bloggers? What are the things they like about their machine and things they don't...
The one thing I don't like about mine is.. The throat space. The neck of the machine. Its hard to get a large quilt folded up in there. It can be done and Ive done all my quilts on it.. Its just a bigger one would be a bit easier. Choosing your sewing machine is a big purchase.. so take your time.
Tools
Here are a list of things I use ALL the time!
1- Thread - I only use two types of thread. My first choice is Rasant 120. Its a Polyester/Cotton thread. Its economical and I just love it. The colour range isn't huge.. But most of the time I can find the perfect colour.  I use this thread for piecing and quilting. The other thread I use is Gutermann 50, 100 % cotton. The colour range is bigger is Gutermann, But its a bit pricier. Good Quality thread = A well running machine and great stitches. Thread can be the make or break of how your machine sews. Don't scrimp on thread.
2- Curved Safety Pins - I use these for Basting my quilts... Ill cover this in Week 8.
3- Sewing Machine needles. Two things - Buy the appropriate needles for your machine, and Buy the appropriate needle for what your sewing.
 As a rule, I use - a needle 70/10 for finer fabrics
80/12 for piecing quilting weight cotton fabrics
12/14 for quilting my Quilt.
4- An Unpicker - or Seam Ripper. This little tool is often my enemy. I don't like unpicking...Who does?
5- Glass head pins - These are great and I use them the most. You can iron over them and all is OK..
6- Flower head pins - They lie nice and flat and are usually longer in length than regular glass pins.
7- Plastic pearl pins - These are just cheaper... don't iron.. they melt!
8- Applique pins - These are tiny little pins that you use to hold little pieces of fabric on. Used mostly with applique.
9- A walking foot - This foot is used once you have your quilt basted together and you are ready to quilt it. It is used for straight line quilting. It grabs the layers of fabric evenly as its quilts them together. If one doesn't come with your machine, you can buy them as an extra. They can be a little expensive... but definitely worth it.
10- A Free Motion Quilting Foot - This foot allows you to draw with the needle. This is the foot Quilters use when they stipple or do designs all over the quilt. I will cover more Quilting in Week 9.
11- 1/4" foot - This foot makes sewing an accurate 1/4" seam easier. Most Quilt Patterns use a 1/4" seam allowance. Elizabeth Hartman says "Sewing an accurate 1/4" seam is one of the keys to successful patchwork piecing".
Remember Amy from Amy's Creative side?? She has LOTS of great Tutorials related to this on her blog...

They should keep you busy!! There are other feet and attachments that come with a Sewing Machine... However, these are the ones I use for Quilting. So, once you have these organised... Lets start...
 Sewing our QC Quilt.
Take one coloured square and one white square.
Lay one on top of the other and pin to hold in place.
Next, take a ruler and draw a fine straight line from one corner to the other corner. I just used a pencil, but you can use a pen or anything..you wont see it.

Put your 1/4" foot on your sewing machine. Line up the edge of the 1/4" foot with the line. Sew down one side, 1/4" in from the line. 
 I normally use a beige thread when I'm piecing.. But for photography purposes and teaching you... I have used a dark purple thread. Your square should look like this.
Next, turn your square around and again, use this line as a guide... sew down the other side.
Your square should now look like this.
Take your rotary cutter, mat and ruler.
Line up your ruler and make a cut along this drawn line. You will now have two triangles.
Open them up and press. I always press on the 'right' side of the fabric, and press the seam towards the darker colour.
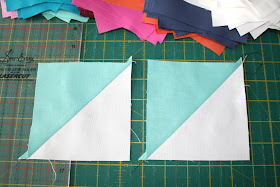
Repeat with your other triangle. You will now have -
Two half square triangle blocks.
 Repeat with your remaining cut coloured squares and white squares. From last class Week 3 - Cutting... You should have 12,  5" x 5" Squares from each 7 colours and 84,  5" x 5" white squares. For this quilt, always Pair a coloured square with a white square. Next Class, I will show you different designs you can do with these squares, how to piece them together accurately, and constructing your Quilt top.

Guest Blogger this week will be Cindy from Live a Colourful Life.  She's one of my fav bloggy friends from the beginning. You will quickly fall in LOVE with her projects and her obsession with her gorgeous selvage creations...  and She might just have one for you!!


Tuesday, April 26, 2011

My 2 cents...

Over this Easter break i have had some more time to do some of the things I Love. Spend time with family and friends, to cook, to sew, and to 'read' blogs...
I read Jennifer's blog post and Rachel's about being real, followed by this post then this one ....and then a discussion going on over at whip stitch.... YOU. CAN. SEW.  I felt compelled to add my 2 cents.


I tend to live in a bubble in my house. We don't watch the news, read the papers..As far as the world going on around me??? I only over hear bits and pieces of conversations.. just enough to make me glad i don't hear the news constantly. It effects me. There is enough heart ache and sadness amongst our friends and families that who can cope with the added burden of world problems.

So reading about the discussions going... I felt compelled to add to the discussion and write my thoughts.


Whats so hard about being nice??
 Whats so hard about being supportive, happy for someone else?

Jennifer's post was all about Dumbing down Quilting... Traditional vs Modern... Can anyone really be bothered causing a fuss? Don't we have enough on our plates to worry about if Modern Quilting is wrecking the tradition? It wasn't the fact that i was offended by the topic I was moved to write because it was just another time when someone is being critical of someone else... Who has enough energy at the end of the day to complain and cause trouble...??

I think we forget that we are all women. Were all the same. WE all have the same worries and fears. We worry if we are measuring up. If were doing a good job raising our children, If were spending enough time teaching them, loving them, to raise them into well rounded human beings.. We juggle the daily chores of cleaning a house, washing clothes, some of us working full time. We juggle the school run, the afternoon activities, taking the kids to their sporting practise, the dinner and bed time routines and barely make it through the day to wake up and do it all again the next day.  We worry about if we look good in our clothes, should we exercise more, or eat less. Should we go help that person who is in need, should we lend a listening ear to our friend who is upset. Should we invite the new neighbours over for dinner? Do we do enough for our husbands and work on our marriages. Do we sew/blog too much? Do we need more/less time for ourselves? Did we make the best Easter hat this year and what about our kids reading.. Are they learning their words for school? What about our bills? We stress over Financial trouble. Are we giving to the children, but not giving too much... Are we good mothers, wives, friends? The list really is endless... I could sit here and write for hours.. the things women think about constantly throughout the day..

On top of all these worries and fears... WE also have 'REAL'  problems that we face daily. Are we suffering with depressions? Anxiety? Troubles in our marriage? Are we grieving? Are we struggling financially? Are we searching for happiness?


So, the timeless question is......

Why cant we just band together as women??
Why cant we love and support each other? Is it really that hard?
We ALL have the same problems....the SAME fears, the SAME worries, the SAME heartaches.

Why cant we be happy for our neighbour or friend when something good happens in their life instead of trying to compete to be one better? Why are we in a society of competition? To be the BEST the better wife, the better mother, the better friend. Why cant we be genuine? Why cant we let others see the REAL us. I think things would just be so much easier if we all let our guards down and were genuine and actually contributing to the conversation by explaining the REAL you. I think we could offer support and love for each other. I think we could really learn from each other. We could really help each other. Offer genuine love, guidance, support.

I have kept this blog a little out of reality so to speak.. Not because I didn't want each of you to see the 'real me' but because i needed something not associated with the 'real me' to keep me going. I needed a place that i could think about something other than families, children, being a mother. I needed a part of my day to escape the 'real life' something to keep me busy so that i didn't have time to think.

I found that in sewing, In designing quilts, writing patterns, about the next new fabric line, reading blogs and sharing in something someone is making.

Real life for me is hard. It is a struggle. Its hard to get up each day, Its hard being surrounded by everyone pregnant and having babies.  Its hard leaving the house and its hard being home. Its hard having tons of spare time when i should be busy holding a baby. Its hard smiling and talking to friends who talk about pregnancy, babies and children. It's hard being happy when I'm dying inside. Its hard counting my blessing when i cant forget what i have lost.

Life is hard... It is really really hard. But sewing has helped. It has given me something fun to think about. Something totally unrelated to real life. I have found a happiness and joy from sewing. I started a blog to keep me busy, to be able to share what i love to do. To sell my quilt patterns, to be apart of an online community. And now, to teach.. To help others find joy and happiness in sewing...

So many people email me and ask why i am not charging for these quilt classes. And the reason is.... I cant. I don't want to. Its more than that... These Quilt Classes is my way of giving back... what blogs and sewing and quilting has given me. I want to be able to teach women and mothers like me... Who need something to help them get through the day.  Something to give them a little joy and happiness. Something they can do to escape. Something they can do for their own sanity. Maybe sewing isn't you things.. Maybe its painting, drawing, cooking, making,... Whatever it is....?? I just have a skill that i can share. I have learnt how to sew.. and its so so easy I want to be able to share it with others. Teach what i know. I'm not a qualified quilter, teacher, seamstress... but i just love sewing. And in helping and teaching... its helping me.

In regards to the discussions HERE... Anyone can sew. Who cares what it looks like, if its not technically perfect, if the colours or fabrics aren't right. Who cares if you change a pattern or its a simple block.. If you love it and it brings you happiness... then that's all that matters.

This blog post is a little scary for me..Its a little 'real' and I'm usually the quiet type who just smiles and then goes home and has a massive debrief with my hubby! But i really felt compelled to write and voice my 2 cents... which is probably more like 75 cents worth!! That we just need to remember, that we are all women. We have ALL the same dramas, problems, concerns... that we should be that better friend that helps and loves.. and is genuine. Wouldn't life be so much easier if we could all just be genuine and real.

And i just want to say Thank you to all of you. For all of your lovely comments and emails. I don't get to thank you enough.. I probably wouldn't blog if i didn't have anyone reading. I try and reply to all of you.. Sometimes life gets in the way... But i love each and every comment and it really helps me... helps me to have the strength to keep going.  xxx I hope you had a wonderful Easter with your family and friends, Love Bec  xxx

Sunday, April 24, 2011

You HAVE to meet Rachel...

I have been following Rachel's Blog since I started following blogs.. She's Amazing...

Hello there! I'm Rachel from Stitched in Color, where I share my passion for color and modern design in stitches. Looks like you all are having a great time here. Thanks for having me! I'm stepping in today to talk with you about cutting, but I see that Rebecca has already done a great tutorial with all of the basics. Let me see what I can add!

Last fall I led Colorbrick: a beginner's quilt-along, which showed my readers how to make one of my original designs and my very first quilt over a long series of posts. Rotary Cutting 101 included tips like how to keep the ruler from slipping. Your ruler may have a side that's slightly "grippy" or barely textured. Check and see! Always place the grippy side down on the fabric. Also, see how my hand is raised in a "spider" position? This works better to prevent slipping than placing your palm flat on the ruler.
I also check that the fabric is completely free before moving the ruler, and I like to avoid repositioning my fabric at all costs!  This saves time, since you don't have to re-align straight edges.  If you have a small mat, you can simply rotate your mat, while holding the fabric flat, to situate yourself for the next cut.  Or, you can move from one corner of the table to another to access your mat from 2 sides.
My next cutting tutorial in the Colorbrick Quilt-along showed how to cut fat quarters to make the brick blocks used in our quilt. Rebecca's already covered most of those basics! But, if you're new to rotary cutting, you may be wondering how to approach a large piece of fabric. It's one to thing to manage a itty whitty fat quarter, but what about 3 yards! Where do you start to create a straight edge? How do you fit the fabric on a small mat?

My tutorial on cutting yardage and making sashing will help you conquer those big pieces! Your first goal is to accurately fold the fabric so that you can make a straight edge on the true grain of your fabric. You'll want to match up the selvedges and then shift and slide your fabric in the air until it hangs flat.
Wondering why your fabric must be in the air? This is the critical part. Keeping the selvedges aligned, shift the fabric as necessary so that there are no pull lines and the fabric hangs flat. This shifting is similar to how sliding doors move on a track. Depending on how straight the fabric store cut your fabric, you may need to shift just a little or a lot. Having help at this step is critical with a large length of fabric (like 3+ yards).

Next, my tutorial walks you through folding your fabric...
Be very careful when you fold! Every fold introduces an opportunity for wavey edges.  Try to keep the fabric that remains on the table very still and match up the first fold to the selvedges carefully.

The last step before you're ready to cut is to align your bottom folded edge with a horizontal line on the cutting mat.
Try to disturb the fabric as little as possible.  Depending on your situation it may work well to pull the fabric down towards a horizontal line or instead to move the cutting mat under your fabric to align.  As shown in the previous step, use your hand to press down on the crease to see where the fold will hit the cutting mat when the ruler is placed over your fabric.
Place your ruler over the right edge of your fabric and trim off whatever is necessary to make an even edge.

After that you're ready to cut strips of whatever width you desire - for sashing, patchwork, anything!

I hope these tips and photographs give you a little more confidence when wielding a rotary cutter. For more detailed, step-by-step directions, you can find links to my complete tutorials at the Colorbrick Quilt-Along menu.

Thanks again for having me, Rebecca. And you all enjoy your quilt class! I hope to see you again sometime at Stitched in Color!

See, i told you she was great!!... Thanks Rach for stopping by xxx

Easter Morning..

As we celebrate Easter with our Families and Friends... Lets take the time to remember, the most important part about Easter. And what it means to us... 


Have a wonderful Easter... xx


Friday, April 22, 2011

To wash or not to wash??? and a Giveaway!

Meet todays featured quilter Leanne. It's great she has stopped by, she really knows her stuff!!!

Hi to you all.
I am Leanne from Mount Vincent Quilts in the Lower Hunter Valley of NSW, Australia. I am a Long Arm Quilter and a patchwork teacher at All About Sewing. I have been patchworking and quilting for 11 years. I have a Diploma in Textile Technology, so I know a bit about stuff. I would like to share a little of what I know about Washing of Fabrics. Thanks to Rebecca for having me over to share today. It's a great honour...

To wash or not to wash? ...
That is the Question Quilters the world over ask.

When fabric goes through all it’s processing, (ie. Weaving, dyeing, printing )there are a number of chemicals that it comes into contact with. One of which is Formaldehyde. The fabric is treated with this so that it can be exported around the world without attack from all the various insects. This is a very powerful chemical and can cause rashes on the skin, breathing difficulties in children and who knows what long term effects there may be.

So knowing this you would think that I would always wash fabric as soon as it comes through my door. But I don’t. Silly I know…
The only fabrics I pre wash/soak are homespun or yarn dyed fabrics in dark colours. ie, Navy, Black, all Reds and Bottle Green. These fabrics run very easily because some have excess dye left in them.


Fabric that is printed is not usually a problem because the fabric paint is heat set to stop it from coming off the fabric. Some really cheap fabric may have inferior paints that may bleed but I have not had this problem.


I prefer not to wash, as I like the starches left in the fabric to keep it firm. I find it much easier to handle. When it is washed it becomes soft and floppy. I do wash my hands when I'm finished.

If you do want to wash all of your fabric there is a couple of ways to do it.

1.To release the excess dyes in dark fabric, fill a tub or bucket with hot water and immerse the fabric into it. I place something on top of the fabric to keep it immersed eg. Laundry liquid bottle. I leave it there until the water is cold. Then you give it a quick rinse and spin in the washing machine. Line dry and press. Doing this doesn’t effect the colour of the fabric. The dye that is released is just residual dye that didn’t soak into the fibres.

2.To wash your fabric to get rid of chemicals, it needs to be washed on a full cycle in the machine with washing liquid/powder. To reduce the fraying you can place it into a pillow slip and secure the top, or some sort of laundry bag. You could overlock the ends of the fabric and place it as it is into the machine and I have heard that if you clip the corners off the fabric that it will also reduce fraying. I haven’t tried this so I can’t say if it works. Wash on a normal cycle, line dry and press.

Another dilemma is the pre-cuts. These do not wash well. They shrink a little and they fray away. I wouldn’t wash these no matter what. Just be sure to wash when you’re finished.


An upside to not washing the chemicals out is that it keeps the insects out of my stash. This can only be a good thing.
Once I have finished a quilt it is then washed before it is put onto a bed, a couch or gifted to someone else. If I’m selling the quilt I don’t wash it but I put a message in for it to be washed before use.
If you are unsure about a fabric in your newly completed quilt, I always wash in cold water, never let it soak and you can always pop a colour catcher sheet in the wash with it. This product catches any excess dye that is released into the water.
Thanks for reading and I hope I shed some light on this topic. Happy Quilting, Leanne...xo

Wanna WIN this fabric???


Leanne is also having a great GIVEAWAY over on her blog..
She is giving away a Fat Quarter bundle full of
15 FQ's in the 'Where the wind blows' Collection

Giveaway closes Tuesday 26th April 9pm.

Thank you so much Leanne for stopping by to share all your knowledge with us.
 If your a local to me, Leanne also offers a great Quilting service.. You can contact her HERE..

Thanks Leanne xx

Wednesday, April 20, 2011

Quilt Class 101 - Week 3 - Cutting


Week 3 - Cutting!!

Cutting is so so important when making a quilt. I think sometimes it can be over looked or rushed. When I first started quilting I had no idea what tools I needed, or how to use them properly. I didnt know about cutting and sewing accurately. I quickly learned that if you to make a quilt where the seam lines all line up properly and its accurate, you need to begin by cutting your pieces.... properly.

Tools
There are lots of different tools that you can get for quilting, but there are a few, that I feel are a must!
Rotary Cutter - When making a quilt, you really shouldn't use scissors to cut your fabric. Scissors can't provide the accuracy you need. Rotary Cutters are sharp and will accurately cut through a couple layers of fabric. They come in different brands and different size blades. I have only ever used a 45mm blade and I change my blade about every 2-3 quilts. My Rotary cutter is a Clover brand. I used to use an Olfa, but i find the clover one fits comfortably in my hand.
Cutting Mat - If your using a rotary cutter you need a cutting mat. My Cutting mat is a self healing mat that measures 18" x 24". I would love a larger mat, but havent got around to buying one as the one i have does the job just fine. When buying a mat, try and get one at least 18" x 24". This will allow you to cut a full strip of fabric folded over selvedge to selvedge. Check that the grid is easy to read and the markings are 1" apart with markings also at every 1/8" .
 Ruler - A clear acrylic ruler. My ruler is 6 1/2" x 24". It has grid lines 1" apart with markings at 1/8". This size ruler will give a nice clean straight cut, and will cut a full piece of fabric folded selvedge to selvedge. I find if you have anything smaller for your ruler and mat, you will find yourself frustrated and off to buy the bigger ones.
Red Pepper Quilts has a great tutorial HERE about her Rotary Cutter and Mat.
There are a few things your will find along the way that you will need. Try and cut your fabric on a high cutting bench. The kitchen bench height works great. A dining table is a little low but still works fine, your back may get a little sore from leaning over. For quilting you will also need a pair of sharp scissors and a tiny pair for cutting threads..
Like i said...When I first started my cutting skills werent great. I used to cut back to front and with the cutter in the wrong hand until someone showed me the correct way.. Im right handed and have written this for a right handed person. So if your left handed.. The same rules apply just do the opposite.
Fabric Requirements
If your following along, and are going to make this QC Quilt (Quilt Class Quilt), You will need :-
                                      OR 2 charm packs ( 84, 5" squares)        
                                      OR 12” strips of 7 Different fabrics.
  •  60" x  White fabric or a Main Solid Colour (I used Kona Cotton - Snow)
How to Cut Properly
1.  Take your first fabric piece. If your using yardage like me, Fold it in half, so your selvedges are together. I always press my fabric before i begin cutting, so its nice and flat.
2.  Lay your piece of fabric on your cutting mat. Using the guide on your Mat, line up your selvedges along the bottom line.
3. Take your ruler and lay it vertically on the mat close to the edge of your fabric on the right hand side.
 4. Using your markings on your mat, line up your ruler, so your cut line will be perfectly straight.

Place your LEFT hand firmly on the ruler to hold it in place. With your rotary cutter in your right hand, trim off the edge of the fabric so it is nice and straight. I always like to stand when im cutting fabric, your hand is more steady. If your Left handed... Steady the ruler with your right hand and cut with your left.

I find it best, holding your rotary cutter at a 45 degree angle like this...and applying a constant even pressure when cutting...
5.  Flip this neatly cut edge of your fabric over so it is now on the left hand side of the cutting mat. With your selvedges across the bottom, line the trimmed side of the fabric up with the vertical lines on the mat.
6.  Using your ruler, line up the edge of your fabric with the marking at 5". Cut a strip of fabric 5" wide selvedge to slevedge.
It is important to have the piece of fabric you are measuring and cutting UNDER the ruler. This makes it nice and flat and using your rotary cutter, you can cut an accurate 5" wide strip.
7. Set this 5" wide strip aside. Move your ruler across another 5" and cut another strip 5" wide. You will now have 2 strips cut selvedge to selvedge, 5" wide. (If you are using Fat Quarters, Cut 4 strips, 5" wide).
Repeat these steps 1-7 with your remaining 6 colours.
Cutting fabric isn't one of my favourite parts of quilting, so I try and speed it up a bit by cutting a few fabrics at a time.
 I probably wouldn't recommend this if this is your first time cutting. It would be good practise for you to cut them all individually. Also check your blade, if your blade isnt super sharp it can have trouble cutting through a few layers and can cause nics in your fabric.
NEXT,
Take your White (Kona Snow) fabric, remember to iron, trim the edge, to make it straight and neat.  Flip it over to left side and following the steps 1-7 above. 
From your White fabric Cut 11,   5” wide strips, selvedge to selvedge.
Once you have all your strips cut, It is time to cut them into 5" x 5" squares.
Lay your first strip horizontally across your cutting mat.
 The selvedge should be on the right side of the mat. Line up the bottom of the strip with one of the lines marked. Take your rule and cutter and trim off the selvedge.
Flip this strip over like before, so the trimmed side is on the left. Line up the bottom of the strip with line markings on the cutting mat. Take your rule and you are going to measure 5” across and cross cut your strip. You will now have two squares measuring 5” x 5”. Set aside.
Continue to cut along this strip until you have 8 squares each measuring 5” x 5” per strip. Cross Cut the other coloured strip into 5" x 5" squares. Repeat with remaining 6 colours. I like to lay a few strips on my cutting mat to save time.
Now take your white strips and Cut 8, 5” x 5” squares per strip. Repeat with remaining 10 strips. So you will now have 88, 5” x 5” squares.

In order to make this QC Quilt top. You need to have:-
  • 12,  5” x 5” squares of each of the 7 colours. So a total of 84 squares , OR two charm packs.
  • 84,  5” x 5” squares in white (Kona Snow)
If your using Fat Quarters, your strips will be different lengths but in the end you will still get 12,  5" x 5" squares from one Fat Quarter.

I hope I have explained it clearly and easy for you to understand... Please email me if you have any questions!! I found another great Tutorial for Cutting HERE  and HERE

I Need to mention... To those of you who have designed your own Quilt for our Quilt Class.... When you are working out the sizes for the pieces of fabric.. You NEED to allow for seam allowance!! SO if you have drawn a block that is 4" x 6"... When you cut out that block.. You need to add 1/2" to both the width and the length. So your Cut block will measure 4 1/2" x 6 1/2". This will allow for your 1/4" seam allowance.

There are also a few other types of cutting. Fussy Cutting? Is where you cut around a specific image on the fabric. Stack and slash? My cousin Kate has made alot of her quilts this way. Is where you layer your fabric in a few piles and make random cuts, and you then rotate the fabric pile over and sew them back together..  

This week I'm happy to introduce to you two more of my favourite Quilters

First.. Leanne,
a local Long Arm Quilter from Mount Vincent Quilts... She will be telling us all about the most asked Question by Quilters... Too wash or not to wash your fabric before Cutting?????
AND she has a great Giveaway going on for YOU over at her blog... A fat Quarter bundle full of 15 FQ's in the 'Where the wind blows' Collection by Melly and Me. Pop on over to enter...
Then,
Rachel from Stitched in Colour. She will give us more info about cutting fabric, smaller mats, cutting large cuts of fabric, cutting sashings...etc.