Tuesday, September 13, 2011

Quilt Class 101 - English Paper Piecing - Part 1

Wanna Make some Hexies??
Jane (Inchy Hexagon Gal), from Quiltjane is here with today, To teach us all about Paper Piecing these lovely Hexies!!! 
Today... Part 1 -  All about Paper Piecing..
Tomorrow?? Part 2 - A Paper Piecing Tutorial!

Welcome, I am Jane (aka Quiltjane) from Want it, Need it, Quilt. Rebecca has invited me here today to participate in her 101 quilting series to present English Paper Piecing (EPP).

There is so much to tell you about EPP that I could not possibly place it in one post so, I will start with the basics.
What is EPP?
EPP is a technique where the fabric is basted over precisely cut shapes. Then, using tiny whipstitches the shapes are sewn together.
Why is it useful?
EPP has been a technique used since the late 18th Century. Tiny scraps of unstable fabrics, such as silks, could be managed easily using this technique to produce intricate designs.

The EPP technique promotes accuracy. The paper template provides:
  • an accurate finished measurement for every piece made
  • takes the worry out of where to start and stop your seam intersections and
  • negates the errors in maintaining a perfect 1/4" seam allowance when sewing.
Tools
EPP is a technique that requires no special equipment. The basic tools for EPP are:
  • Papers
  • Template
  • Scissors / Un-picker
  • Needle, Thread, Thimble
  • Fabric
  • 2 Small Paper Clips
  • Pencil
Papers
Templates are traditionally made from paper. The cheapest and most accessible method. You can use copy paper, copy paper wrapping, magazines, junk mail flyers, light weight cardboard.
Although these days there are a few more alternatives to paper. Two I have used are:
  • Freezer Paper 
  • Floriani Stitch N Wash
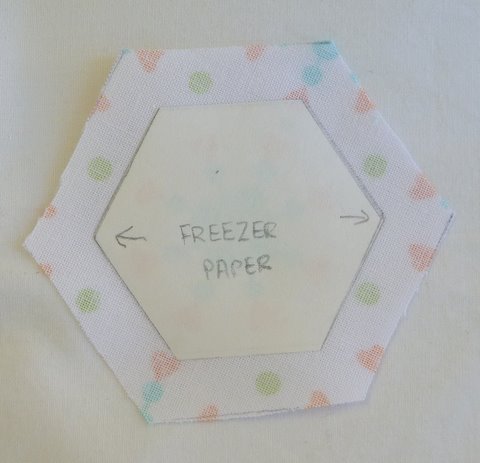
Both are cut to the finished size of the piece and pressed to the back of the cut fabric. It removes one step from the overall process by  taking away the requirement to pin the template before basting. 

Another alternative is the mylar plastic hexagon templates. They are durable and can be reused over and over. They are made from heat resistant mylar plastic with a hole punched into the centre for ease of removal.
Scissors
A nice sharp pair of scissors and an un-picker (yes, sometimes they are needed) for cutting threads and fabric.
Needle
I use a big eye between needle 10, 11. I find these needles assist me in getting a really small stitches. If you find holding the smaller needles gives you pain, try the 11 milliners needles.
Thread
Two types of thread are used in EPP. The first thread type is used for basting the fabric to the paper template. This thread can be any colour and any type ( Cotton or Polyester ). You will find that a heavier weight thread will be stronger for basting through many layers of fabric and paper.
The second thread type will be used for whip stitching the pieces together. The finer the thread, the less obvious the stitches. I use a matching thread in 50wt Masterpiece cotton. Another alternative is the 60wt Bottom Line polyester thread. Very fine and easy to use. (If you use bottom line, do not place a really hot iron on it for extended periods of time. It can soften the thread). Matching threads can be an expensive option. If the thread is very fine, you can get away with the basic neutrals of white, ivory, light grey, dark grey and a dull gold colour. They should blend with most fabrics. Always use white with white and black with black. If you like matching colours, Superior Threads have released the MasterPiece frosted Donuts with a bobbin full of a rainbow of colours. 

Glueing the fabric to the papers is now becoming a trend. I user this quick method often. The most important thing to remember when using glue is that it is a fabric glue, water soluble and non staining. Don't steam your finished pieces until you are ready to remove papers. Heat and steam will soften the glue and the fabric will lift. There is a short tutorial here using this method. 

If you do glue your papers and fabric, staining can occur if stored for a long period of time. Manufacturers cannot test their products on every fabric type, chemical in different fabrics, effects of light etc. I would recommend only using glue for short term projects and then washing the finished piece. I would never use glue or any other chemical on a show or heirloom quilt. 
Fabric
This is the fun part. While you can use silks and linens for some texture, I always love working with cotton fabric. You can choose solids, small prints, large prints, stripes or dots. When you choose a fabric, look for its potential for how it will look in the finished block.

I love fussy cutting the fabric to produce repetitive and interesting designs for the hexagon petals. Lay your clear acrylic template over the fabric and imagine the possibilities that can be achieved by using different repeats in the fabric. 

Here is an example from Melody from the House on the Side of the Hill blog, who has fussy cut fabrics from French General and 3-Sisters fabric. Magnificent.
Joanne from PbPatch blog has used the same repeat in the fabric to make a Kaleidoscope affect ( 6 piece hexagon )
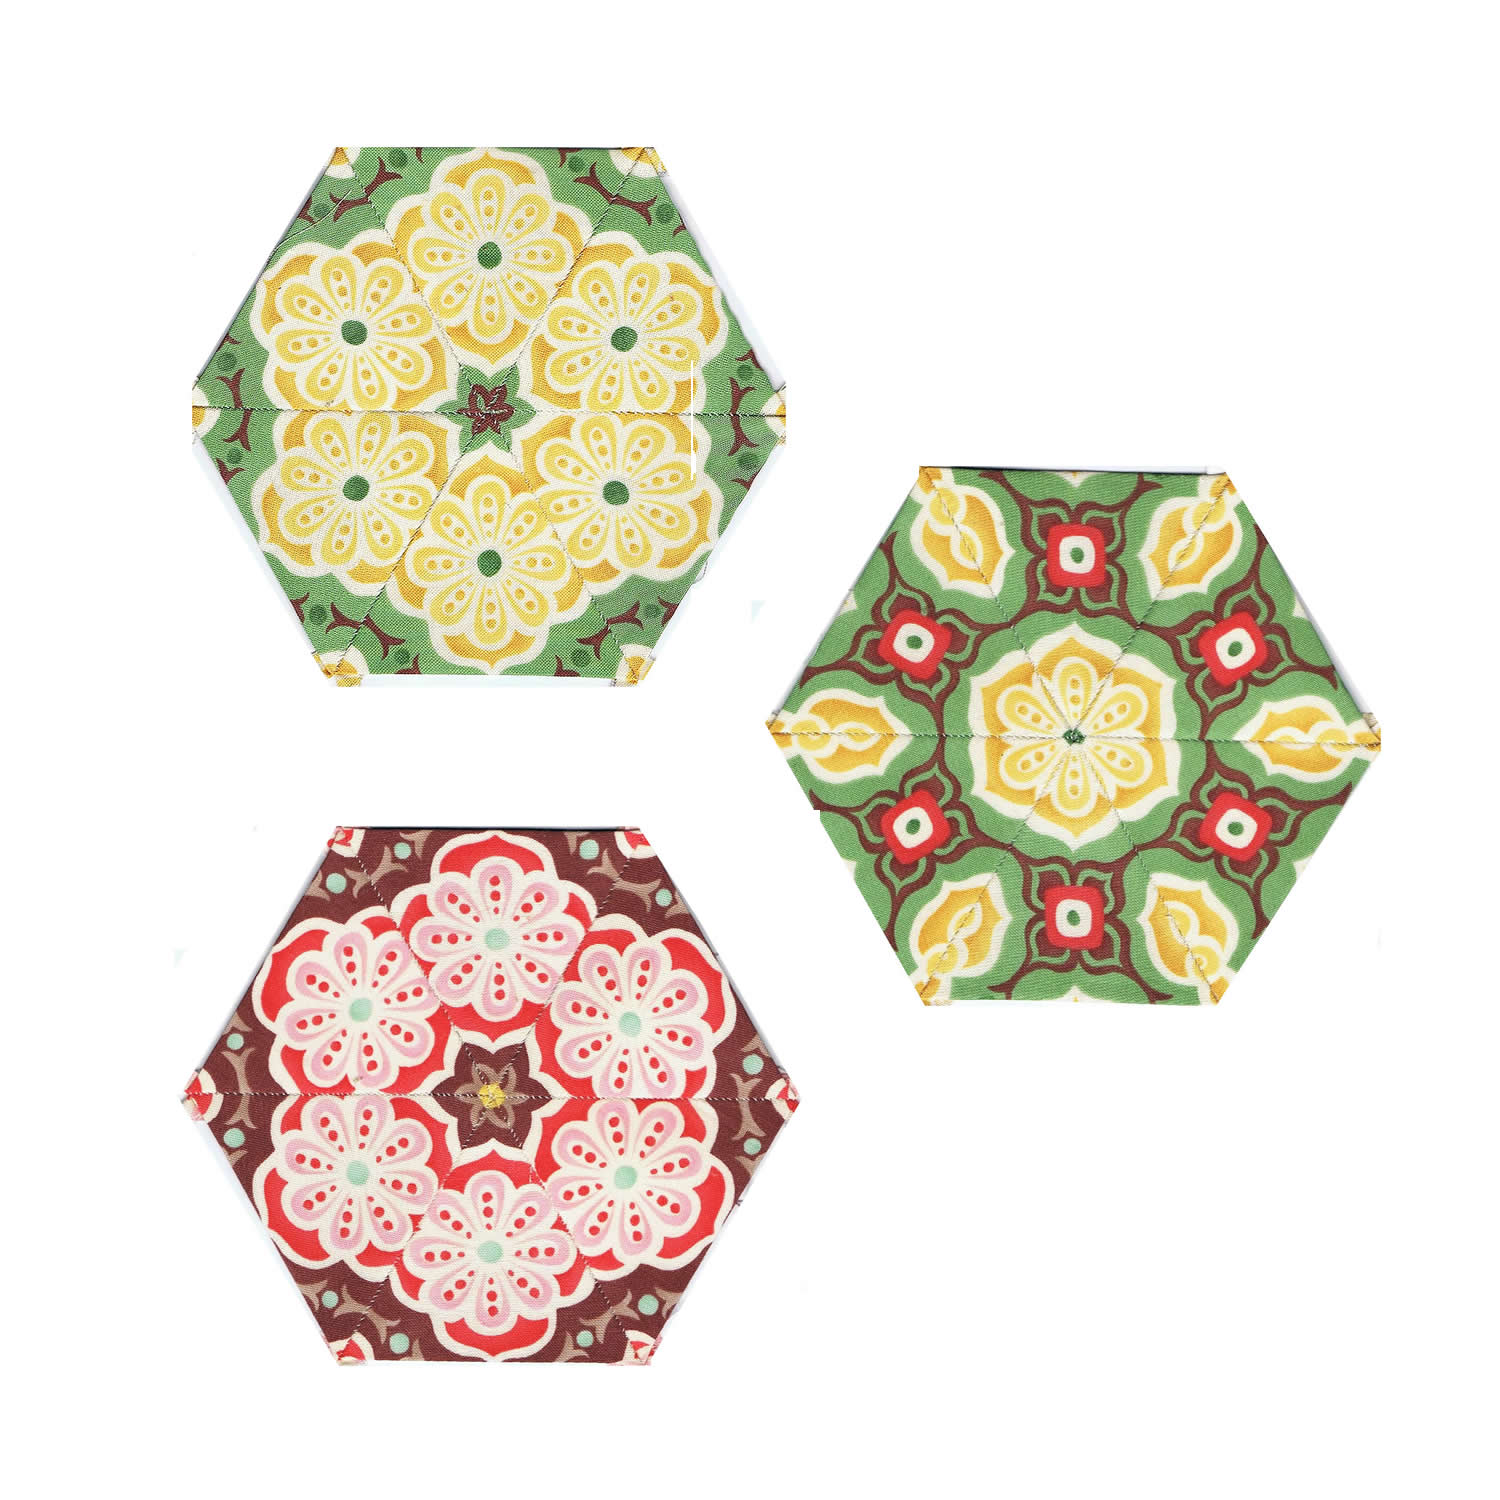
and these beautiful flowers...
The  good thing about EPP pieces they can all be different colours and fabrics to give it that real scrappy look.
Templates
If you cut your own papers, then you will require an acrylic template for that purpose and another one to cut the correct size for the fabric. There are many acrylic templates on the market. Some come in two parts: Others are single templates ( with or without seam allowance ):
Printed hexagons by the page can be downloaded from many sites. All you need to do it cut them out. Make sure you print at 100% with no scaling and do not fit to page.
When cutting papers or fabric, always make sure it is done consistently. Accuracy is important. Place silicon strips or sandpaper dots under the templates so they don't slip. Use a very sharp pencil when tracing.
Emerging on the market are affordable Die Cutters that provide a way to mass produce your own papers and cut fabrics. If that is not an option, there are many sites that provide pre-cut fabric in packages. Here in Australia I use Joanne from Pbpatch for my papers. I was excited to learn Joanne has just released pre-cut hexies in designer collections.
Portability
The wonderful thing about this technique is you can take it anywhere and leave the papers in for as long as you like for stability and storage.
It is also a very flexible technique. Unlike making a block by machine where the pieces and rows have to be added in sequence, EPP can be more forgiving and allow pieces to be slotted in afterwards. The best thing about EPP is that you never have to be afraid of Y-seams.

So........ Are you ready to try???
Pop back tomorrow for your step by step guide!!
Thanks so much Jane... xx

signature

Friday, September 9, 2011

Have you ever seen anything THIS amazing??

OK, We're off with a BANG!!! Quilt Class 101 Part 2 Starts Tonight!!...
Well, just as Quilt Class 101 Part 1 taught you the steps you needed to know about making a quilt start to finish... You can see the list of Tutorials HERE....
Quilt class Part 2 is going to teach you a few Quilt Blocks and different techniques some of you may not have tried before...  New Quilter or an Oldie... I hope this second part will expose you to something new!
AND starting this first week... I'm definitely learning something new!!
The amazingly talented Nova from A Cuppa and a Catch up is kicking our class off with a little Embroidery.....
Thanks Nova!!!
How to Turn a Favourite Object into an Embroidery Design
key embroidery
Over the months, as I was documenting the blocks I was making for my redwork quilt via my blog & flickr, I was often asked “where do you get your designs from?” or “how did you get that design onto the fabric to embroider?”
redwork quilt
The answer :: I either drew, traced or used this super quick and simple way to create a design to embroider. An example of this technique is my favourite walking boots…
shoe embroidery
I’m not a great drawer - I can get by on the most basic of shapes etc but I knew I needed to work out a way to translate my fav objects into simple designs that I could then embroider, without the frustration of trying to draw them & not being happy with the result.

If you have a favourite object or item around the house that you would like to translate into a design that you can stitch up, then grab your camera, take a snapshot and follow these easy steps to transfer a photographed object into a fun & unique stitchery.

Once you see how easy it is, the embroidery design world is your oyster, from everyday objects like scissors, camera, kitchen utensils, tools, shoes, child’s toy, to yourself & your family (take a snapshot of your profiles and embroider around), to your car, a piece of furniture, your house, a boat or caravan, your pet… From simple to more detailed designs, if you can take a photo, draw an outline & trace, you are set :)

I’ve chosen an easy object, a key, to show you how I do it & to give you the basics. I am sure there are better ways and probably easier ways but by sharing with you how I did it at least you can tweak and adjust and find shortcuts to suit your way (and if you do, please share with the rest of us ;)!) I am rubbish at any type of computer graphics, nor do I own a light box - so if I can do it, you can do it!
What you'll need
  • A favourite thing that you would like to turn into an embroidery
  • Digital camera, computer & printer
  • Tracing paper
  • Window
  • Heat transfer pencil (available at quilting stores & Spotlight etc)
  • Fabric
  • Iron
  • Embroidery supplies ( hoop, thread, scissors etc)
Step 1
Photograph your object. If possible it’s a good idea to shoot it against a solid background so you don’t have any distractions.
key embroidery
Take a few pics, try different angles etc. It’s better to have too many than too few and have to go back and re take.
Step 2
Transfer your images to your computer and select the one you want.
As I already mentioned, I am next to useless when it comes to graphics programs (like photoshop etc) so I rely solely on the free to use Picnik . You can get a few more bells & whistles for a small fee but quite honestly the free version is just fine.
Upload your selected image to Picnik.
Flip your image. To do this go to the ‘Rotate’ tab in the editing section and hit the vertical flip button
embroidery tutorial
Your image magically appears as a mirror image of the original.
embroidery tutorial
It’s important to flip if you want your image to come out the ‘right way’(ie the way it was photographed and not a mirror image) when you come to transfer it to your fabric, particularly if your design includes any words, numbers or logos.
Step 3
Strip your image down to the basics with the Pencil Sketch tool. You will find this in the ‘Create’ tab, under ‘Effects’
embroidery tutorial
You can play with the radius, strength and fade (this is a drop down menu that appears when you select the pencil sketch tool) until you are happy with the ‘look’. You are aiming for a strongish outline and an idea of where the shaded areas are. It’s not an exact science so don’t get hung up on this bit, it really is just to strip your image down to outline and shading to make it easier to trace and translate to an embroidery. It might save a bit of printer ink too :)
embroidery tutorial
Save & print to desired size.
embroidery tutorial
Step 4
To assist in the tracing stage, I grab a black pen and draw over the outline. This just makes the parts you want in your design stand out clearer through the tracing paper in the next stage. It doesn’t look very pretty at this point but don’t worry about that too much.
embroidery tutorial
Place a piece of tracing paper over the print out and tape in place (please note:: oops! I took the following pics before I drew around the design as shown in above image but to save retaking the images you get the drift...;))
embroidery tutorial
Go to a window and using a heat transfer pencil, trace over your design.
trace embroidery design
I tend not to go into too much detail as I keep the print out image of the design beside me when I am stitching and add in shading etc by eye from the image. You might prefer to shade the areas you need to stitch at this stage and I am sure that will work just fine too.
trace embroidery design
Using an artistic license is fully encouraged! We’re aiming for a ‘hand drawn’ look so wobbles & a sketchy feel are all part of it ;) Just relax and enjoy the process, it’s all about creating a unique piece that has ‘you’ stamped all over it :)
Step 5
Remove the tape that is holding the tracing paper to the printed design. You now have a transfer design ready to iron on to your fabric.
diy embroidery design
Take your transfer and your fabric
diy embroidery design
Place the transfer right side down (the side you traced the design on) onto right side of fabric.
diy embroidery transfer
Following the manufacturer’s instructions for your heat transfer pencil, iron over the tracing paper pressing firmly. I have my iron on the ‘cotton’ heat setting & I don’t use steam. I iron the fabric first before placing the design on so that the fabric is warm to receive the transfer. I’m not sure if it makes a difference but it’s just the way I’ve always done it.

Be sure to hold the tracing paper in position with your free hand (keeping your fingers away from the hot iron!) so it doesn’t move while you’re ironing or you will have a smudged or ‘double vision’ design when you remove the tracing paper.

I like to have a little peek under a corner of the tracing paper to make sure the design has transferred to the fabric before I remove it entirely as it would be almost impossible to reposition it exactly if you missed a bit.

The harder you press with the heat transfer pencil when you are tracing the design, the stronger your design will be when you iron it on to the fabric. I pressed quite softly; hence my design came through quite light, which for this simple design without much detail is fine.
embroidery transfer
Step 6
Add embroidery hoop, needle & thread of choice and get stitching! I usually use a simple back stitch, not very even or overly neat either I might add! I think my technique is best described as 'doodling' with needle & thread, ( aka 'scribble stitches') adding in shade and shadows as I go.
embroider
When your stitching is complete, you have a personal & unique embroidery to add to a quilt, a cushion, a pillow, a bag, purse, pouch, clothing, table runner, place mat, frame it, use it as a quilt label... the possibilities are endless!
key embroidery design
The end result - an (almost) life size stitchery of an old key that looks like it’s been hand drawn and stitched over.
key embroidery design
Thanks so much Rebecca for inviting me to share this little tutorial with you today x
Have fun with it & happy stitching :)x
*Please note that there are other ways to transfer your design to your fabric, eg:: trace directly to fabric with pencil or fading ink or water soluble ink fabric pens etc, but for the purposes of this tute I’m just sticking to the heat transfer pencil method I used in my redwork designs.
HOW COOL is that??!!! Thanks so much NOVA...
signature

Monday, September 5, 2011

Twins - 2 Finished Quilts!

I have always really wanted twins... I think for the fact that i get REALLY sick when I'm pregnant.. SO, two babies for the price of one pregnancy sounds delightful.
I'm also madly in love with babies.. so the thought of getting two at once... is like a dream come true. I'm sure its not all roses juggling them both once they're here.. So, I'm equally excited that my friend Kylie is having twins.. I get the best of both worlds. I get to play with two babies! I don't have to go through the months of vomiting or survive those sleepless nights....
and you all know you cant have babies without a quilt or two... Last week for me.. was spent sewing up a storm. Two Quilts for Two identical baby Girls!
I sneakily grabbed a paint swatch so i could match the fabrics to her babies room. And being as though I'm a 'pink' girl... these were a lot of fun to sew, once i got in the groove.
Just as I'm sure twins can bring their added amount of stress... these quilts came with their fair share. First of all I was so worried about making just the perfect quilt for her. I was trying to create something to suit their rooms, something plain, not too quilty, something modern, something with a babushka, something that matched her colours.. something quick as i had to make two... and i got myself in a HUGE mess! I had sewed two quilt tops together.. and HATED them!! I let them sit and torment me for a week and as the days counted down... It was Monday and i wanted to have them both done for the baby shower on Saturday. No pressure or anything!
 I decided to cut them both up and start again. Lucky i had a bit more fabric.
I decided to just sew something that I loved and it would all turn out OK.. And it did. I LOVE them!
My Lesson learnt.... Don't try and sew something that isn't you. People love gifts that are apart of you.  Gifts that have your stamp of love and style.
 These two both measure around 40" x 50"AND bonus.. I really like the new design, I'm going to make it up into pattern for you. Its a simple Quick fun quilt to put together. I think the pattern will make up a larger throw size version.
For Quilting, I decided to stipple both Quilts....
I wanted them to have that aged antique look..
Before they were all packaged up and ready to deliver....
I chucked em in the wash and dryer.. I love how crinkly they turned out.
Oh... and Lesson number 2 learnt... REST!!
After a super busy week of sewing, kids, sports, dinners, the usual groceries, cleaning, washing, PLUS roadshow, late nights, my new exercise routine, baby showers, Fathers day and festivities,... i need to REST! 
I had a nice early night planned for my hubby and I in front of the TV but instead i was lucky enough to spend the night in Hospital!
Yep, i spent the night in hospital with a kidney stone. Not fun! Doctors orders..Hubby's orders.. to take it easy for this week. SO i might just spend a few days in bed....

signature

Tuesday, August 30, 2011

Hooray for Fabric Stashing!

I have been in desperate need of some basics to add to my stash... SO, I  had a little splurge..
Shopping Spot number 1... A Stack of Kona Cottons from Marmalade fabrics.. Tammy has such a great range..140 Kona Cottons and counting!!
I also couldn't resist the new Heather Ross... and I found this cute Peach Dot from  HERE that matches perfectly!
I was actually surprised how soft and light weight the fabric is. I had imagined it in the same basket as her Far Far Away II collection. But its not at all... Its more of a quilting weight cotton.
and my shipping box wasn't quite full... just enough room to squeeze in a little Fat Quarter from Melody Miller's new range.
Next shopping spot... Skye Reve Fabrics.. She has a great range of  Dots.. and I'm waiting on another parcel..... I'll share those fabrics with you when it arrives...
Shopping Spot number 3.... from Fabricworm..   I had been waiting for this fabric to be released... I bought two Fat Quarter Bundles in Joel Dewberry's new line Heirloom.
 Fabricworm also have them on sale at the moment!! You can buy yours HERE
 I have cut mine up into little pieces for a new Quilt for a Magazine.. Hopefully I can show you before i send it off...
Well,......... these should keep me busy for a little while!
or at least another week or so   ;)
I'm off to finish a couple new quilts I've been working on.. I'll show you pics soon.... xx

signature

LinkWithin

Related Posts Plugin for WordPress, Blogger...