Thursday, June 30, 2011

Quilt Class 101 - Week 11 - Hand Quilting

Thank you for all your lovely comments regarding my Blogiversary!! There were some Great Random facts about each of you.. very funny! Thank you for sharing them with us... xx Winners will be announced shortly...

Its Quilt Class time again.. These weeks come round so fast!! I swear they keep getting shorter and shorter.
 I have a disclaimer before we start. You will have to excuse the pictures a bit. Some are a little wonky, some a little out of focus, I cropped some because the centre was WAY off!! I had both hands needed for the tutorial.. and so,  I needed the help of my little assistant in taking the pictures. She just turned four and not a master of the camera just yet. The only complaint SHE had was that I was interrupting her watching High School Musical.. She would only take a few quick snaps and that HAD TO DO!!  Now that I have excused my crazy pictures... I have a tutorial for you...
 Hand Quilting
First off... Tools.  For Hand Quilting Cotton, I use a ball of Pearle 8 Cotton. It comes in a large variety of colours. It is the perfect thickness. I mostly use the DMC brand but i do have a couple other brands i have come across that seem great too.  I also use a leather thimble. It has a small metal plate that protects your finger. I wear it on my right hand, middle finger, as this is the finger that does most of the work. The metal plate is just in the perfect spot to help you push the needle through. I have tried the open metal one (below) that you can see but I find I like the flexibility and grip of the leather. Needles are a hard one. These are my favourite so far. Embroidery Needles size 9.  A pair of scissors, and a little zip purse to keep it all in.
 Hand Quilting is one of my favourite parts of making a quilt. Its nice to just sit somewhere and sew. Its relaxing, therapeutic, i just love it.  It also adds a 'handmade' touch to your quilt. It gives a nice soft texture and your quilt drapes beautifully.
OK, Cut a length of cotton. I think text book teaches you about 18 inches or so.. But i always like to do more like 36 inches, so I'm not stopping and starting as much.
Take your length of cotton and tie a single knot in the end.  
I don't like to use a hoop, I tried once and couldn't get it to sit just right. When I hand quilt, I sit on a couch with my knees tucked up and the quilt drapes over them.
 For this quilt I'm going to hand quilt 1/4" from the seam. You can mark your quilt top, sometimes you can see a shadow of the seam underneath to follow, or you can just guess. I usually just guess. Hold the fabric flat in your left hand and the needle in your right. (opposite if your Left handed). I hold the needle between my Thumb and middle finger and guide with my pointer finger. Push your needle down through the three layers, back up, down, then up...
 Pull your thread through till your knot is at the end.
 Give a slight tug and your knot will slip inside and get lodged in your batting.
 Take your needle again and push down through all three layers and back up, down and back up. Try and get your hand in a rocking motion.
 I try and get two or three parts on my needle before i push the needle and thread all the way through.
 Use the metal plate in the thimble to push the needle through.
 Pull the thread all the way through
 Continue your hand quilting and your rocking motion as far as you need to or until you get close to the end of your thread.
Once you get near the end of your thread,
 Make a loop and thread your needle through the loop to create a knot.
 I like to position the knot about 1/2" away from my finishing point.
 Next, put your needle in where your next stitch would go, ONLY through the Top and batting layer. Angle it so it comes up about an inch away from where you are quilting.
 Pull it through and your knot will sit out.
 Give another slight tug, so your knot slips under the top and gets caught in the batting.  Cut off the thread remaining.
 To continue on, get another length of thread and start again. This time your starting in the middle of the Quilt top.  Tie a knot at the end of your thread, start about an inch away from where your previous stitches were.  Put your needle in through your top two layers, be careful not to go all the way through to the back. Bring your needle up right where your next stitch needs to go.
 Pull your thread through.
 Like before, give a slight tug so your knot slips under again...
 And your ready to continue right where you left off....
 Try and keep your stitches as even as you can. I usually snip all my threads once im all finished. Hand quilting can be a little slow to start with, but with practise you will get alot faster. When you flip your quilt over.. You will have the same stitches come through the back.
Continue along...... and your done!
I have decided to do quite a lot of hand quilting on this quilt. Lucky I enjoy it so much!

I hope that helped you. Kate from Kate Conklin Designs has a great Hand Quilting tutorial on her blog. She holds her needle slightly different to me and uses a different type of thimble. You may like to pop over and have a read of hers and see which way suits you best.

Do you have a Hand Quilting Tutorial you would like to Share with us???


signature

Sunday, June 26, 2011

Giveaway and Pattern Sale

Happy Blogiversary to Me,
Happy Blogiversary to Me......
Happy Blogiversary to Me!!!

I can't believe it. It somehow feels like I've been blogging forever but yet not really that long at all.
 When I first started my blog 12 months ago, I had no idea how much fun it would be....
 Getting to know each of you
Hold Giveaways
 Have Featured Bloggers and
 Be featured.
Blog land is such a great and inspiring place to be apart of.

So, Lets celebrate!!
A Pattern Sale and a Giveaway...
**Now Closed**
For the next 48 hrs..   Buy a Pattern, get one FREE...
If you Buy a Downloadable pattern from my shop, send me an email and tell me which pattern you would like for FREE , and I'll send it to you!!
You can Buy my Patterns HERE

Now, for the Giveaway!!!
Kimberly, from the Fat Quarter Shop wants to celebrate with us. She has offered 3 Gift Vouchers for the Giveaway. Three winners will be Drawn Random, Tues Night 28th June.

How to enter...
* Leave me a comment and tell me something Random about you that I don't know...
* For all of my lovely followers you can leave another comment! You have helped make this last year a blast!  I am forever grateful for all your comments, encouragement, love, and support along the way.

To get you in the spirit..
Here's 15 things about me you may not have known..
  1. My husband proposed to me by having flowers and chocolates delivered to my door. In the box of chocolates, the middle chocolate was missing and was replaced with a ring. He hid outside the door for a few hours that day, waiting for the delivery man, and waiting to hear my reaction, before he knocked and got down on one knee... Of course I said YES.
  2. The last 12 months I finally kicked the disgusting habit of biting my fingernails.. I think I've been too busy sewing instead.
  3. I haven't watched a news program since my son died.
  4. I LOVE Linen, flowers, gardening, magazines and decorating my home.
  5. I'm obsessed with all things lace, vintage or french..I would love to go to France one day.
  6. No matter how hard I try, I am always 10 min's Late... Everywhere.
  7. I wish I could sing.
  8. Believe it or not, I'm actually really really shy. My ideal world would be staying at home being a hermit.
  9. I love being a mum its all I've ever wanted.
  10. I hate being sick, but for some reason never take medicine. Maybe I procrastinate, maybe I'm just lazy, maybe I think if I let my body fight it, I'll get better.
  11. When I go to a restaurant I always order the same thing for fear of ordering something different and being disappointed.
  12. I get angry when I'm cold.
  13. I am hopeless at parking my car. I have had a few accidents and rolled my jeep.. but I'm a good driver!!!
  14. I once wrote a mother profile on Creating a Childhood HERE
  15. My hubby calls me a SEWLEBRITY! 
Thanks for a Fun year!


signature

Friday, June 24, 2011

How I'm Quilting my QC Quilt.

LOTS happening this week....

*I had such a great time at the Craft Fair on Wednesday.. I bought a few bits and pieces and the makings for my next quilt and pattern. I'll tell you all about it and show you some pictures soon.
* I'm headed back to the Show tomorrow to be with Saffron on her stand, so if you will be there, come visit us and say hi!!
* Drum roll.............Its my Blogiversary THIS WEEKEND!!! Can you believe it?? Its been 12 months! Time has flown by in blog land. I have a great Giveaway and Pattern Sale kicking off tomorrow, so pop back so you don't miss out!

But for today, I'm ready to Quilt my QC Quilt. If you missed last class on Machine Quilting, you can read about it HERE and if you want to catch up with a few of the classes, you can follow along HERE.

 OK, I was a little undecided on what design I should actually go for. I have really enjoy straight line quilting, 1/4" off the seam allowance and was going to go for that. But, i really felt the quilt needed the Zig Zags to remain the focus and not have crossing lines intersecting them... SO... I decided to follow the Zig Zag and quilt in between them like this...
 Are you ready to Quilt?? and wanna know how to start???
Step 1, I mark my Quilt if i need to. For this Quilting design, I needed to.
I use a water soluble quilting marker/pen and put a small Dot in the centre of the seam. If you look closely you can see them.
Next, I take my ruler and draw a faint line to connect the dots.
Continue to mark all the way across your quilt. I then marked each white Zig Zag from top to bottom, the same.
 Step 2. Load up your machine. I swap my needle to a 90/14 needle, and change your normal sewing foot to a walking foot. A walking foot really is a must. It cleverly grabs your quilt sandwich evenly and feeds it through your machine together and at the same speed. If you don't use a walking foot, your quilt top and backing get fed through your machine at different speeds and you will get slipping, bunching and pulling on your quilt back. Not good!

Step 3, Start your Quilting at the centre and always work right. You only ever want to have 1/2 your Quilt rolled up under your machine at any time. The majority of your quilt should be on the left of your centre and you work of the right side of your Quilt. To understand this better, I'll show you how to I do mine.

 For this quilt I'm working horizontally. I find the centre of the quilt top on the Left side. This is my starting point. In between the orange and the blue zigzag is the centre, so this is the one I sew first. When you start in the centre,  the first couple quilt lines are the hardest. This is because while your quilting your working to fit 1/2 your quilt under the throat of your machine. I find this easier to manage if I roll up the right side of the quilt to allow it to fit through. So,

Lay your quilt down flat, roll up the right side of my Quilt till you reach the part your sewing. Put your Quilt sandwich under your walking foot.
Just before your first dot, do a few little reverse/back stitches to secure. When you get to your dot, put your needle in the down position.
Lift up your walking foot and turn your quilt so your diagonal line is straight. Sew down until you reach the next dot.
Put your needle in the down position, Lift your presser foot and swivel your quilt to sew down the other side.
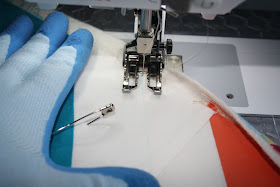
As you sew, I place both my hands lightly on the quilt, to guide the fabric through and make sure its nice and flat. You can see my rolled section near my right hand.
Remove any pins you need to as you continue across the quilt til you reach the other side. And you have your first line quilted!!!... It will look like this!!
For this quilt, I'm worked from Left to Right across the quilt. The next line I will do will be in between the orange and pink left to right, then in between pink and pink and continue each row until I have reached the top. (working on the right side of your centre)
The next step is to work on the bottom section. Turn your quilt upside down so the pink section you have just quilted is at the bottom and the blue section that needs to be Quilted is at the top. You repeat your quilting the same as the above step.. By working across your quilt again and still working on the right side of your centre. Does that all make sense??

Well, I'm off to finish Quilting the rest of mine... I hope this has helped you and email me or leave a comment if you have any questions!!

 Don't forget to come back tomorrow to celebrate with me!!
signature

Tuesday, June 21, 2011

Quilt Class 101 - Week 10 - Machine Quilting

Quilt Class has come a day early this week, cause I'm off to the Craft Fair tomorrow!! I'm so so excited!! I will also be helping Saffron at her stand on Saturday, So if your able to pop in... come say HI!! There is lots happening this week... Something exciting on the 24th June???... mmm I'll leave it with you.. see if you can guess? xx

Quilt Class 101 - Quilting By Machine
If your following along and you have your quilt top to this stage, and have it all basted like this, you are now ready to Quilt!! How are you all doing?? Still hanging in there???

There are a couple tools you really need for Machine Quilting your quilt. Firstly, a walking foot (the big one on the left) for straight line quilting. The one on the right is a free motion Quilting foot if you want to draw your designs.
You should also try and grab yourself a pair of gloves. These Ansell ones you can buy from your grocery store for about $5, or you can get proper machine quilting gloves called Machingers.. I also change my needle to a size 90/14. A longer heavier needle works better for getting through the three layers.
Now, the FUN part... Choosing a design...
If your a beginner I would stick with your walking foot and try doing straight line quilting at first. The easiest straight line quilting is when you quilt, a 1/4" off your seam line. I did that for this quilt.
 I find it fast and easy and hides mistakes if your needle wanders a bit.
For my very first quilt, I thought the only way was to stitch in the ditch. Stitching in the ditch is where you sew exactly on the seam line. You have to go slow and it can look untidy if your a bit off. I found it alot harder than they say.
Stitching 1/4" off the seam line also gives it a nice look on the back.
 Red Pepper Quilts straight line quilts 1/4" off the seam, for ALOT of her quilts. Check Here and Here for some inspiration.
The next thing you can try is Free Motion Quilting

I am NO expert when it comes to free motion quilting. I took a great class taught by Deborah Louie. She is amazing. She taught us some great techniques and got us thinking outside the square of stippling and trying something new.
Its a bit tricky and takes LOTS of practise. Its fun though... So if you have some time, set up a few small quilt sandwiches and have a play...
Its also great to practise your skills on a few coasters, place mats, hot pads, or bibs you might make..
Next, If your not game to do it yourself, you can hand it over to one of your trusty Professional Quilters. They have hundreds of beautiful designs you can choose from.


Well, I'm going to leave you to browse through Flickr HERE and HERE and think about how your going to Quilt your QC Quilt. I will show you shortly how to Quilt your Quilt and what design I'm going do for mine.
If you would like to share some of your quilts you have quilted either straight line, or free motion, it would be great to see them Linked up Below!


signature