Showing posts with label Quilt Class 101. Show all posts

Wednesday, October 5, 2011

Circle of Geese Block tutorial....

Hey Everyone!! I have missed you... I have been FLAT out this week! Literally...!! Ill explain later...
But for today... I am so excited to Introduce Cara to you!! She is a super Mum! She has put an amazing Tute together for us... The Circle of Geese Block.. I have absolutely NO IDEA how to make this block so i jumped up and down when she said she would share this with us..... Thanks Cara... xx
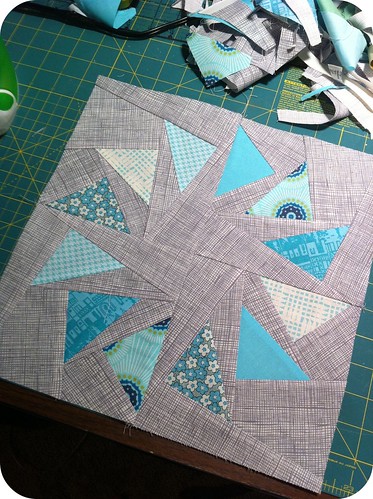
Hello Chasing Cotton readers!  I'm Cara from Me? A Mom? and I'm so honored Bec asked me to come over and teach you all a block.
circle of geese block
Today I'm going to show you how to successfully sew a Circle of Geese block without hurling your scissors across the room or pulling out your hair. This is one of those blocks that can intimidate many but trust me when I say if I can do it, you can do it.

This is a paper-pieced block which means you stitch your fabric onto a piece of paper following the lines that are pre-printed on the paper. And it really is that easy once you get the knack of it. This block is a lot like learning how to ride a bike. It might be hard at first but, once you learn it, you wonder how you ever struggled.

The trickiest part of assembling this block, in my opinion, is that it involves lots of turning and flipping and folding back of fabric and paper pieces. It's easy to get confused and make mistakes so this tutorial has a ton of pictures.

This tutorial also involves some extra steps to help you avoid issues. As you get more comfortable with how to assemble the block, you can cut out some of the extra steps. Or you can throw caution to the wind and just skip them all together from the get go.

Okay, so let's get started.

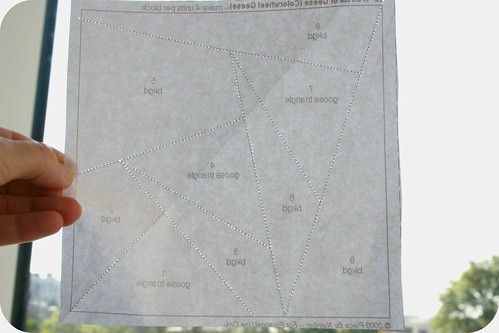
First you need the template. I like to use this one. (Note: sometimes that link doesn't work for whatever reason. If that's the case for you, go to http://www.piecebynumber.com/and go to the freebie tab. Look under geometric and you'll see the circle of geese block.) When you print it out, make sure it's printing full scale and not being scaled down. I had to decrease my margins to get it to properly fit on one page.  You'll need four copies for each block. Print out a few extras to have on hand.
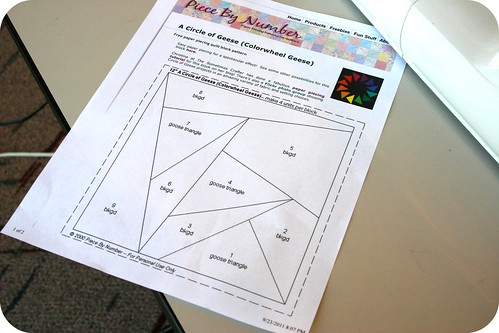
Piece by Number template
Next, cut it out ALONG the dotted line. This will be the finished size of your block section and you'll use the edge of the paper as your trim line when you are finished, so cut it out neatly and accurately.

As you'll see, the sections of this template are numbered. Throughout this tutorial, I'll be referencing these pieces by their number (#1, #2, #3, etc).

Because you will eventually be tearing the paper off from the fabric, I highly recommend perforating the lines on the paper before you begin sewing. To do this, simply stitch along all the inside lines without thread in your needle. IMPORTANT: set your stitch length to the smallest setting so that your stitches -- or in this case, the holes -- are close together.
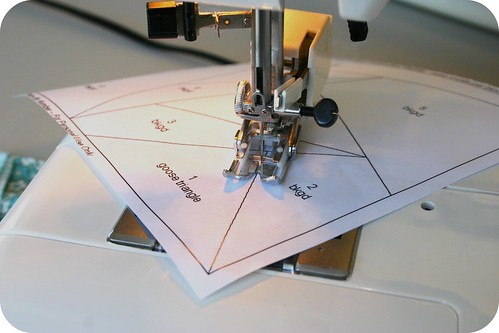
Perforate the paperPerforated!The other nice thing about perforating the lines in advance is that it's handy for when you need to fold back the paper along the lines. And in this tutorial, you'll be doing that a lot.

Okay, next step.

Cut out fabric for your background pieces and fabric for your goose triangle pieces. I find 3" x 5" is a good size; you can go smaller as you get more comfortable but I like to give myself room for error. The first few times you assemble this block, it's helpful to start with larger cuts of fabric. Most of my early mistakes involved using a piece that I swore was big enough but after sewing and turning it, it would be too short. Trust me when I say you'd rather have some fabric waste than the frustration of having to unpick a section because it ended up being a few millimeters short.
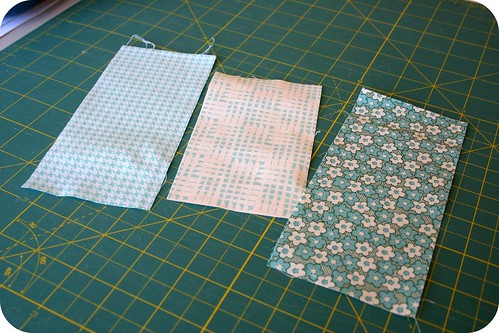
For triangle pieces
For my goose triangles.

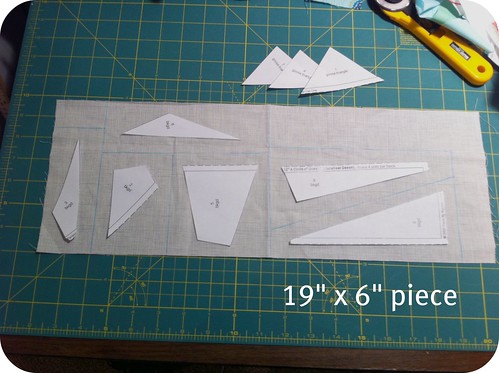
Size of fabric for background pieces
If fabric waste is a concern, a 19" x 6" piece will fit all six background pieces.
Alright, now grab your paper template. You will use the numbers on the paper template as your guide for where to start and where to go next. We'll work in numerical order, so your first stitched line will be the line between #1 (goose triangle) and #2 (bkgd).
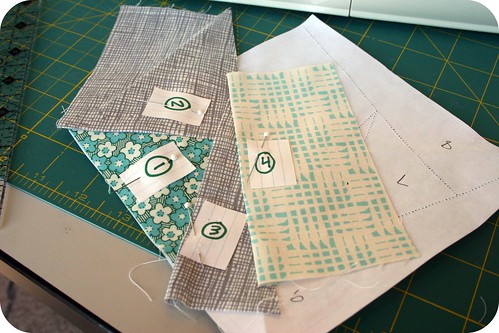
Take the fabric piece for your first goose triangle and lay it with the wrong side facing up (right side facing down). Place your template on top of the fabric with the words facing up.
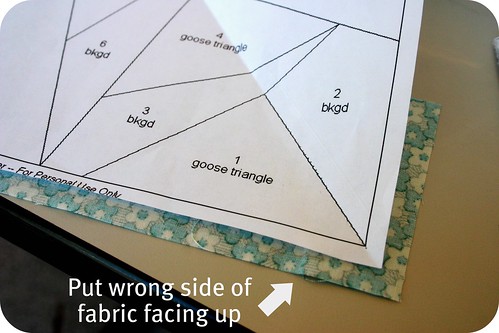
1
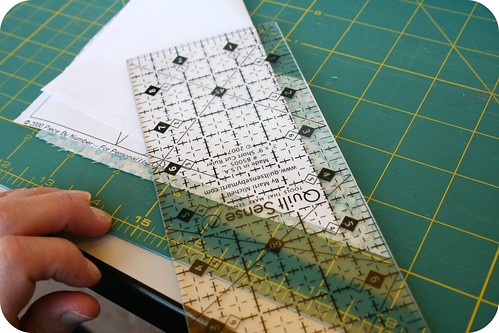
Fold the paper template together at the line between #1 and #2 and -- using the edge created by the fold as a guide, trim the fabric to leave what will be a 1/2" seam allowance. (As you get better at this block and need less room for error, you can trim it to 1/4" instead.)
2
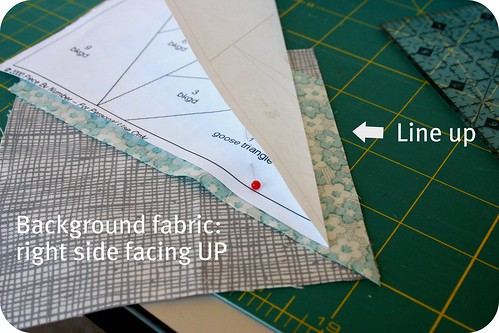
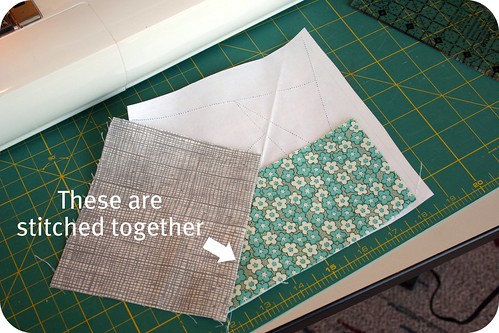
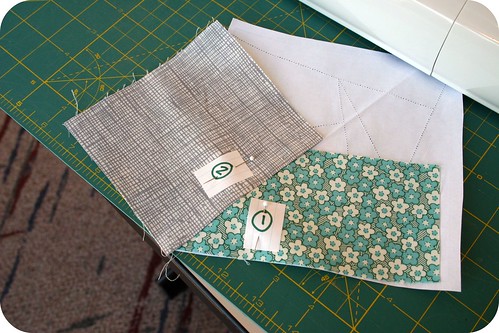
Now you are ready to position the fabric for #2. I know, I know, when are we going to start stitching, right? Hang with me. Place the background fabric (#2) right side facing up under the #1 fabric. Line them up as noted on the photo below and pin.
4
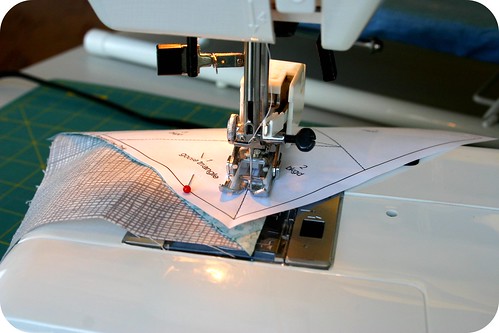
Let's stitch! Fold your paper flat again and stitch along the line between #1 and #2.
5
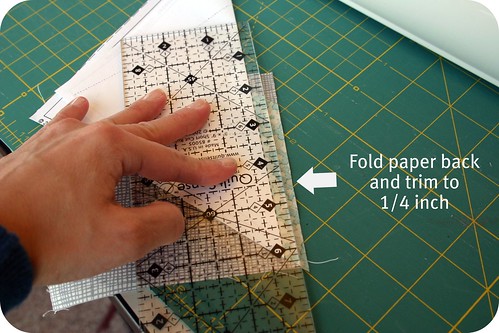
After you are finished stitching, fold the paper back again at the line between #1 and #2 and use the edge of the paper to trim the fabric to 1/4 inch seam allowance. Like I said, you can skip this step obviously if you initially trimmed to 1/4 inch seam allowance in the previous step.
6
Now turn the paper over and press your fabrics open.
7
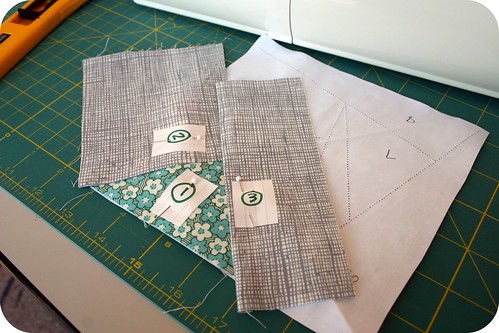
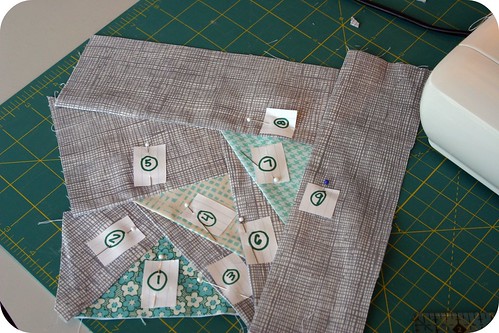
Okay, now from here on out on this tutorial, my photos are going to show the pieces labeled so that you don't get confused. You don't have to do this at home, though I do find it helpful to write the numbers on the back of the paper.
8
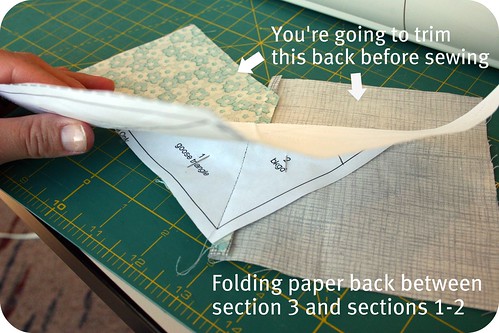
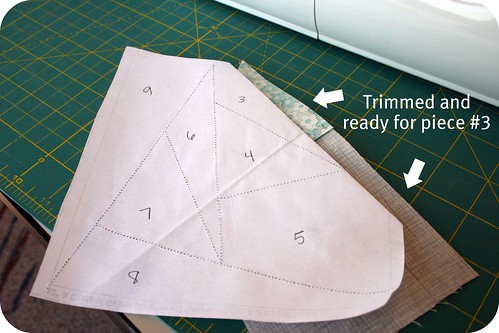
Okay, now you're ready to move onto #3, a background piece. Place your sewn pieces right side down and fold your paper along the line between #3 and #1-#2. Go ahead and trim (leaving either 1/4" or 1/2").
9
Now you're ready to place and sew piece #3.
10
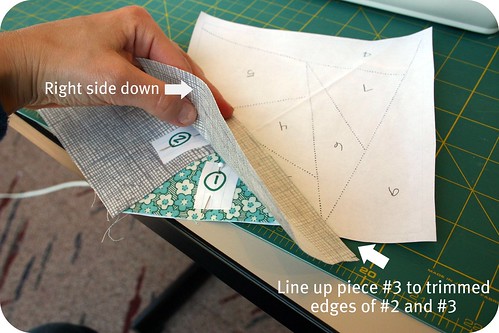
You can either slip piece #3 under the #1, #2 pieces or flip the block over and place piece #3 on top of pieces #1 and #2 (like in the picture below). Which ever way you pick, just be sure your fabrics are right sides together.
11
Stitch along the line between #3 and #1-#2.  Turn paper over and press fabrics open.
13
Next you'll turn your paper over so the fabric is right side down. Fold back the paper along the line between #3 and #4. Continue to repeat the same previous steps of trimming, lining up the next fabric piece, pinning, folding the paper flat, stitching, and ironing the fabric open.
14
Are you getting the hang of it? Go ahead and finish up #5, #6, #7, #8 and #9 following the same steps as above. Just remember to go in sequential order.
almost done!

Almost done! Time to trim. Use the paper as your guide and trim to the paper. If you are trimming paper off, you are trimming too much.  (Sorry, I forgot to get a shot of what the block looks like on the back before trimming.)
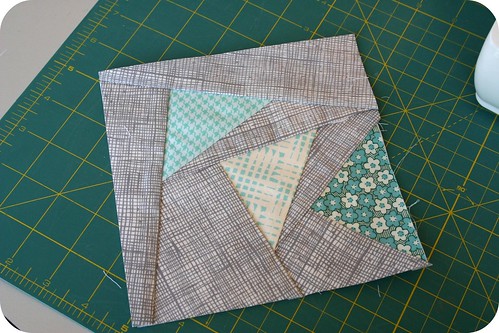
Trimmed
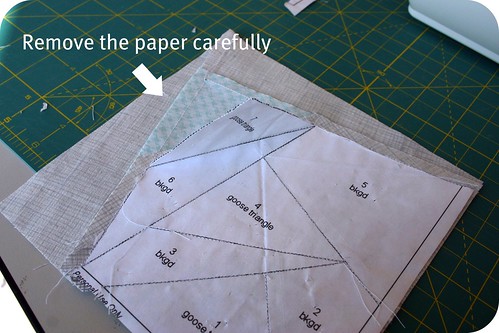
When you are ready, carefully remove the paper. I find that it helps to start with removing #9 and working backwards (#8, #7, #6, etc.).
almost done
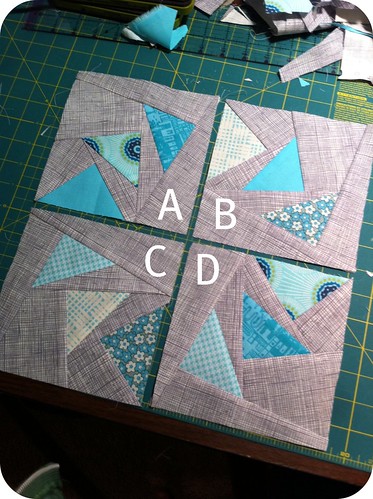
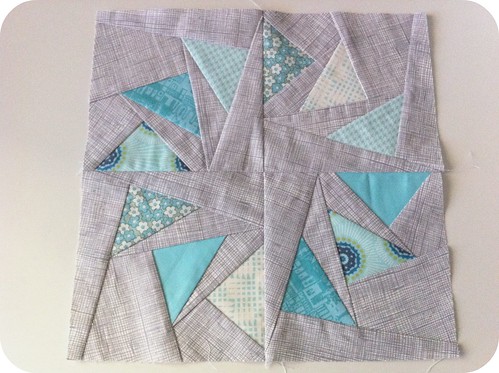
Once you have four sections completed, you are ready to arrange them and sew them together.Sew A to B and set aside.  Sew C to D and set aside.  Then sew AB to CD and you're done!
Figure out your layout
Ta-da! Aren't you fancy!!
finished
Hopefully, I've been able to demystified the Circle of Geese block for you and you're not cursing my name right now. Happy sewing!!  Feel free to come over to my blog and say hello!

Thanks sooooooooooooooooooo Much Cara!!! xx Mystery solved!! xx I hope you enjoyed her Tute... I did! xx

Thursday, September 29, 2011

Quilt Class 101 - the Log Cabin

Hey all! How are you doing? I'm Kaye from Miss Print and I'm here today with a little tutorial for her Quilt Class 101 series. I'm creating a traditional log cabin block - according to Bec I am the queen of log cabins...who knew?! Today we will be creating a 12" log cabin block (12.5" when unfinished) that has three ; I hope you guys all like this tutorial!
What you'll need:
3.5x3.5" piece of fabric for centre square - go ahead and fussy cut something really cute for this!
Scraps of fabric each 2" in width

All seams are 1/4"
Here are your strip measurements - remember each strip is 2" wide:
For inner ring (i.e. right next to the centre square): one 3.5", two 5", one 6.5"
For middle ring: one 6.5", two 8", one 9.5"
For outer ring: one 9.5", two 11", one 12.5"

The Inner Ring:
Starting with your 3.5" strip sew, rights sides together, to the top of the centre square. Press your seams open. I like to press my seams open when sewing log cabins because of the multitude of seams and intersections.
Next sew a 5" strip, right sides together to the right side, of your centre square. Press.
Sew the second 5" strip, right sides together, to the bottom of the centre square. Press.
Sew the 6.5" strips, right sides together, to the left side of the centre square. Press.

The Middle Ring:
Continue adding the strips for your middle ring, as above, working in a clockwise direction beginning with the top strip - this would be a 6.5" strip, then an 8" strip, then the second 8" strip, and finally the 9.5" strip. Remember to press after adding each strip.

The Outer Ring:
Just as with the previous step, continue to add the strips for your outer ring moving in a clockwise fashion beginning with the top strip - this would be the 9.5" strip, then the 11" strip, then the other 11" strip, and finally the 12.5" strip. Remember to press after adding each strip.
Look at that - you're done! If you like continue making more log cabins - 36 blocks sewn together in 6x6 block grid will form a 72x72" quilt which is just perfect for snuggling under!

Thanks so much to Bec for inviting me over today and to all of you for reading along here. I really hope that y'all enjoyed my tutorial and don't be afraid to stop on over to my blog and say hi!

Thanks so much Kaye.. She is the Queen of the log cabin!! I just LOVE her blog and her inspiration!  She has made a couple cute tutorial variations of the log cabin HERE ..
and
for more Quilt Block Tutorials or Tutorials on How To Make A Quilt... You can Find them HERE... 
I hope your enjoying the class!! xx
signature

Wednesday, September 14, 2011

Quilt Class 101 - Hexies - Part 2....

Are you Ready to get your Hexie on?

To Make a 1" sided Hexagon Flower
There are so many methods of  preparing, cutting and basting EPP shapes. Today I will make a flower using paper templates and a simple basting method.

The 1" sided hexagons are a great starter size. The only require 2.5" strips for the fabric requirement. Great project to use with a Jelly Roll

1. Select the fabric
I have chosen fabrics that have an easy repeat to cut.
2. Cutting the fabric
Position the template over the design you wish to repeat. I have added registration markers on the template so I can position it accuracy for every cut. Remember to make the focal area in the centre of the hexagon. Trace around the inside and outside of the hexagon template and cut each one out.
Make one for the centre and six for the petals.
3. Basting the paper templates
I have laid out my hexies and allocated 7 with pre-cut card templates.

Lay the pre-cut card templates with in the guidelines of the fabric hexagon, fold down the top side and attach clip. Fold down the opposite side and attach another clip. This will hold the paper in place.
We are now ready to baste our hexagon. A tip when threading cotton - always thread the needle when the cotton is still on the spool. This will guarantee that you threaded from the correct end of the thread. if you thread the needle from the spool end you will get piling and breakages.
Fold down the fabric over the paper template to make a mitred corner. Start the basting by making a knot. This will secure your first stitch. Make a little tacking stitch in the first corner.
From the tacking stitch fold down the next corner to form a mitre and then make another tacking stitch. Keep the stitching firm but not too tight or you will distort the shape.
Some people like to go through all layers but I prefer to only sew through the fabric at the back.
Keep folding the corners and making a tacking stitch until the hexagon is complete. I like to tack about 1/8 " down from the edge. Do one more small tacking stitch at the end to secure the thread. It should look like this from the back.
And this from the front.
This is an example of a piece that has been basted through all layers. It's easier through light weight papers but it is a preference rather than a necessity. Basting through one layer will hold your hexagon securely.
Continue basting all 6 petals and single centre hexagon. Lay your flower out and start by taking one petal and the centre. There are many ways you can attach the petals to the centre. I prefer to sew all petals to the centre piece and then sew the petals to each other.
Choose a thread that is quite fine - 50-60wt so the threads are buried and the joins lay flat. Don't make your thread piece too long or it will break and get tangled as you sew.
Place the two hexagons right sides together. Make a knot at one end right where the two corners meet. I like to tie on and tie off ( knot ) each segment so if the cotton wears over the years and breaks, you only have to mend a small section.
Begin making very small stitches by grabbing a few threads from each piece - whipstitch. Continue to the next corner and tie off by making a knot.
Continue to add pieces and sew them to the centre.
Continue sewing all the petals together remembering to always match the corner points and tie on and off.
Now you have a pretty little flower for your garden.

To get one lucky blogger started ...
Jane is giving away one 1" Hexaculture pack.
The pack includes:
  • one spool Bottom Line thread
  • Three packs of 50wt cotton threads on the bobbins
  • A fabulous sample pack from Joanne at PbPatch with freezer paper, card and paper templates
  • one fussy cut template from my little shop
  • and 2.5" strips of gorgeous fabric from the Innocent Crush collection.
Pop over to Jane's Blog HERE to enter.....

To see more beautiful hexagons flowers visit the Inchy Hexagon Swap blog and Flickr Groups HERE and HERE...

Thank you so much Jane for sharing some Hexie Love.... I'm off to sift through some scraps to make a 'little' project! xx
signature

LinkWithin

Related Posts Plugin for WordPress, Blogger...