


Week 4 - Sewing
There are endless items to buy and info to read when it comes to sewing supplies. However, with Quilting, there are set items that I use over and over...
First, you need a Sewing Machine.

How to choose a sewing machine??
If your hunting around and making your first purchase.. there are a few things you should consider..1- What am I going to be sewing?
2- How much sewing am I going to be doing?
3- Whats your budget?
4- Are you a beginner or experienced?
5- Try and buy from your local sewing shop. I like to service my machine quite regularly. So its great i have a local shop to take it to.
The next step I would do... Is research. I found it really hard reading about sewing machines online. So I found the best thing to do is ASK QUESTIONS... Ask sewers at the local sewing shop? Or local Quilt Class? You can even try new machines to see which ones you like the feel of. Also, Ask bloggers? What are the things they like about their machine and things they don't...
The one thing I don't like about mine is.. The throat space. The neck of the machine. Its hard to get a large quilt folded up in there. It can be done and Ive done all my quilts on it.. Its just a bigger one would be a bit easier. Choosing your sewing machine is a big purchase.. so take your time.
Tools

1- Thread - I only use two types of thread. My first choice is Rasant 120. Its a Polyester/Cotton thread. Its economical and I just love it. The colour range isn't huge.. But most of the time I can find the perfect colour. I use this thread for piecing and quilting. The other thread I use is Gutermann 50, 100 % cotton. The colour range is bigger is Gutermann, But its a bit pricier. Good Quality thread = A well running machine and great stitches. Thread can be the make or break of how your machine sews. Don't scrimp on thread.
2- Curved Safety Pins - I use these for Basting my quilts... Ill cover this in Week 8.
3- Sewing Machine needles. Two things - Buy the appropriate needles for your machine, and Buy the appropriate needle for what your sewing.
As a rule, I use - a needle 70/10 for finer fabrics
80/12 for piecing quilting weight cotton fabrics
12/14 for quilting my Quilt.
4- An Unpicker - or Seam Ripper. This little tool is often my enemy. I don't like unpicking...Who does?
5- Glass head pins - These are great and I use them the most. You can iron over them and all is OK..
6- Flower head pins - They lie nice and flat and are usually longer in length than regular glass pins.
7- Plastic pearl pins - These are just cheaper... don't iron.. they melt!
8- Applique pins - These are tiny little pins that you use to hold little pieces of fabric on. Used mostly with applique.
9- A walking foot - This foot is used once you have your quilt basted together and you are ready to quilt it. It is used for straight line quilting. It grabs the layers of fabric evenly as its quilts them together. If one doesn't come with your machine, you can buy them as an extra. They can be a little expensive... but definitely worth it.
10- A Free Motion Quilting Foot - This foot allows you to draw with the needle. This is the foot Quilters use when they stipple or do designs all over the quilt. I will cover more Quilting in Week 9.
11- 1/4" foot - This foot makes sewing an accurate 1/4" seam easier. Most Quilt Patterns use a 1/4" seam allowance. Elizabeth Hartman says "Sewing an accurate 1/4" seam is one of the keys to successful patchwork piecing".
Remember Amy from Amy's Creative side?? She has LOTS of great Tutorials related to this on her blog...
They should keep you busy!! There are other feet and attachments that come with a Sewing Machine... However, these are the ones I use for Quilting. So, once you have these organised... Lets start...
Sewing our QC Quilt.
Take one coloured square and one white square.
Take one coloured square and one white square.

Lay one on top of the other and pin to hold in place.
Next, take a ruler and draw a fine straight line from one corner to the other corner. I just used a pencil, but you can use a pen or anything..you wont see it.
Put your 1/4" foot on your sewing machine. Line up the edge of the 1/4" foot with the line. Sew down one side, 1/4" in from the line.


Your square should now look like this.

Take your rotary cutter, mat and ruler.

Line up your ruler and make a cut along this drawn line. You will now have two triangles.


Repeat with your other triangle. You will now have -
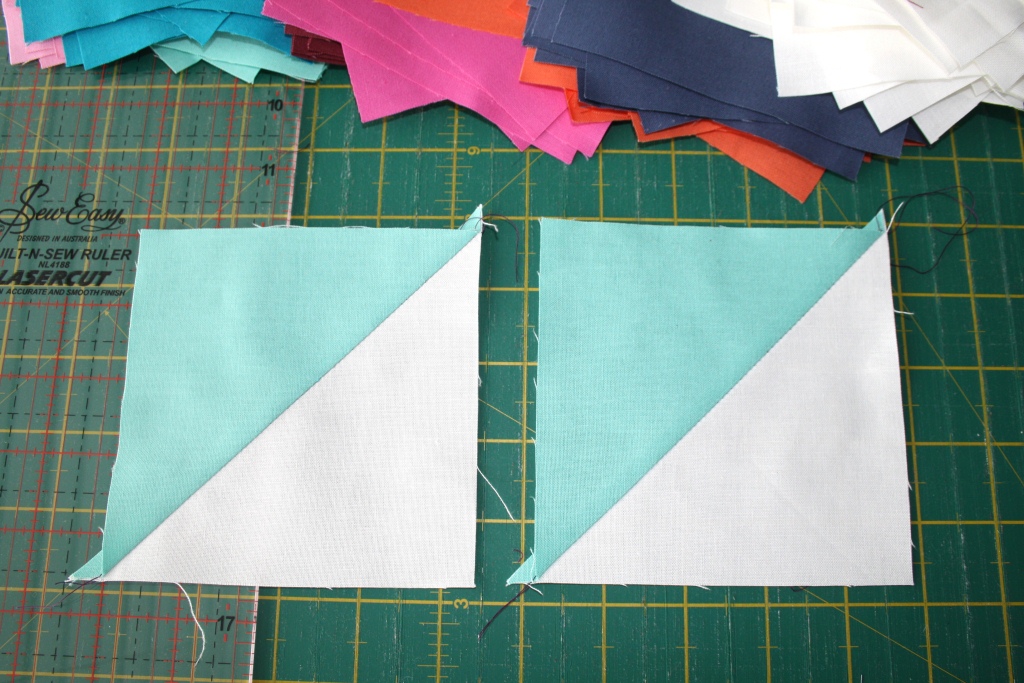
Two half square triangle blocks.
Repeat with your remaining cut coloured squares and white squares. From last class Week 3 - Cutting... You should have 12, 5" x 5" Squares from each 7 colours and 84, 5" x 5" white squares. For this quilt, always Pair a coloured square with a white square. Next Class, I will show you different designs you can do with these squares, how to piece them together accurately, and constructing your Quilt top.
Guest Blogger this week will be Cindy from Live a Colourful Life. She's one of my fav bloggy friends from the beginning. You will quickly fall in LOVE with her projects and her obsession with her gorgeous selvage creations... and She might just have one for you!!
OMG! I'm so far behind! I was always a crammer in school too so I'm sure I can catch up. Your class has reminded me of so many things I knew but forgot I knew. dos that make sense? But it's also teaching me a whole bunch of things I didn't know which is way cool! thanks so much!
ReplyDeleteHello:)
ReplyDeleteI'm a new sewer/quilter, and while browsing through the net I found your blog!!! I'm so happy:) Now, I have the chance to learn so many things about sewing and quilting!!!
Thank you so much for this opportunity!! I see you're already in week 4, but I'll catch up:)
Hope you have a great day!!
Eleni @ sewhappiness.blogspot.com
p.s. I hope that you won't mind if I feature your online class on my blog??
Thanks for all the tips and info, I didn't know you could get smaller pins for applique.
ReplyDeleteAnother great quilting 101 post Bec!! xx
ReplyDeleteOh, Cindy is so sweet! I look forward to her post!
ReplyDeleteYou make everything seem so easy! Thank you for another wonderful post. I haven't cut my fabric yet, because I'm scared I'm going to mess it up. I think I'm going to follow your quilt design instead of doing my own...maybe then it wouldn't seem so scary...
ReplyDeleteAnother post with a bunch of great tips! I can't wait till the quilt all comes together and what other great advice you have in store for us.
ReplyDeleteWhat a great job you are doing, Bec. Great details here. xoxo
ReplyDeleteI am new at quilting. Thanks so much for giving me the opportunity to learn so much! The step by step is fantastic! I am looking forward to your next post!
ReplyDeleteI am currently behind due to a project I have been working on. Thanks for the post.
ReplyDeleteLove your Sewing machine! I use to work for Bernina and they have by far the best machines, one day I will save up for one!
ReplyDeleteThank you for a great post. I love the Fons and porters pins. Very Strong. I use Rasant, Superior (Kind Tut, MasterPiece, So Fine, Omni), Signature threads for long arm and sewing machine. Polyester or Cotton are both great. Poly won't fluff as much as cotton. Using the correct needle is very important but adjusting the tension, storing your threads in a cool dry place, speed and stitch length also help. I am an open seams kind of girl but when it comes to doing in the ditch for a long arm quilter having the seams pressed to one side is much easier for us to guide the foot along.
ReplyDeleteAnother great post of course - thanks!
ReplyDeleteHello,
ReplyDeleteJust wondering where to start Quilting 101, I see lesson 4 but not three,,where do I find it and how do I keep up with the lessons?
Thanks sew much,
Linda J
VA
LJeterpudd@aol.com
You probably should have mentioned that there is usually a right side and a wrong side to fabric, and you need to put the right sides together. It's a common mistake with beginners or anyone who isn't paying enough attention.
ReplyDelete