


I went to a local discount fabric warehouse and found a roll of this fabric. Like i said, having NO IDEA how to recover or how much to buy... I bought 12 meters.. (what was left on the roll). I figure, if I'm lucky I might have some left over to make a couple cushions.

The next part...
I sat for a few hours one day watching You Tube video's on Reupholstering chairs.. I couldn't find one great video that teaches you everything.. But i did watch a few different ones to pick up a few tips and tricks here and there... You can see a good one that i watched HERE

As I started taking off each fabric piece layer by layer... I took heaps of photos so i could figure out how on earth I was going to put this chair back together! I was amazing at how little 'sewing' was actually needed. The whole thing is just stapled together.

I recon this chair had about 1000 staples. It took me around 8 hours to get the staples out. With each layer you uncovered, you found another 100+ staples. Guess what we did one night instead of going on a date???

Tools needed??
Electric staple gun. Definitely Electric!
Box of 1000 staples
Hammer and screw driver to help remove old staples.
Cardboard and metal strips I saw from this You Tube video. (I needed 2 x metal and 4 x Cardboard)
When i went to a local re upholstery shop to see if they would sell me the cardboard and metal strips i needed the man was full of confidence.. and as i was leaving, he happily said..
Bye,.... Ill see you next week after you have stuffed it up!
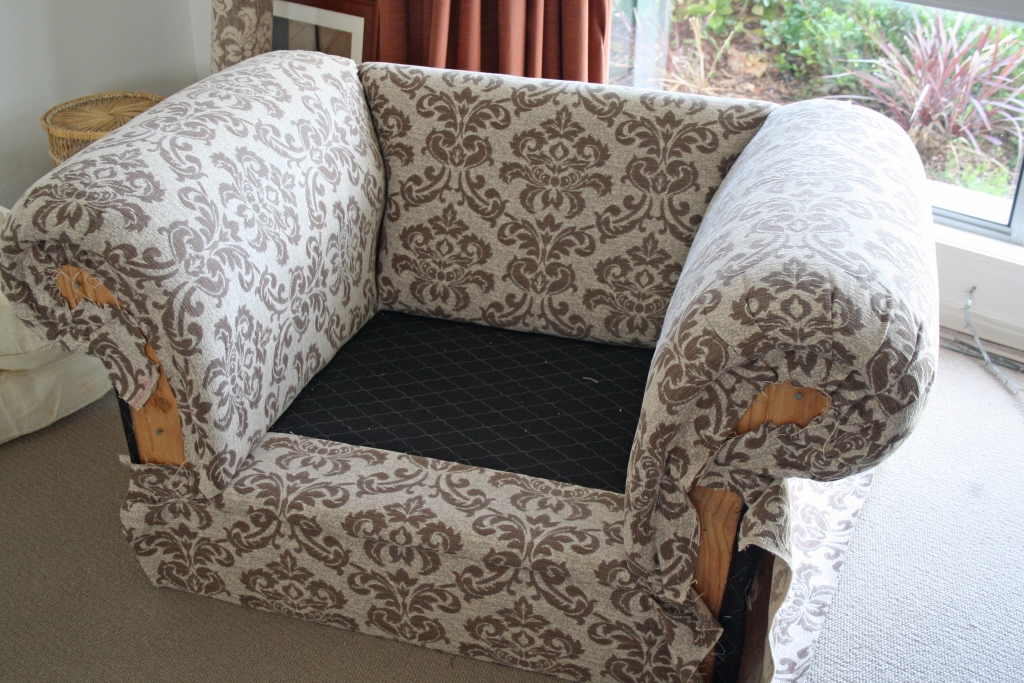
So, with my I'll show you attitude.. I started and the first part to cover was the bottom seat part. I pulled the it off, unpicked the previous fabric, and I just reused the black piece.

The order of my chair to put back together was....
Front/bottom piece, Side curved arms, Back middle section, Under side arms, back piece, base cover and front panelling...and cushions.
TIP:- With the side curved arms and the middle back piece, your fabric needs to go around the frame of the chair. This was probably the hardest part... You need to make a clip in your piece so you can tuck it in under and around the sides. You will understand what i mean as you take your fabric off...
I used the old fabric as my pattern piece to cut my New piece.
When cutting your fabric... Cut a generous 2-3 inches all around your pattern piece. My fabric torn and old, so it stretches, warps, and shrinks...So just give yourself some extra.

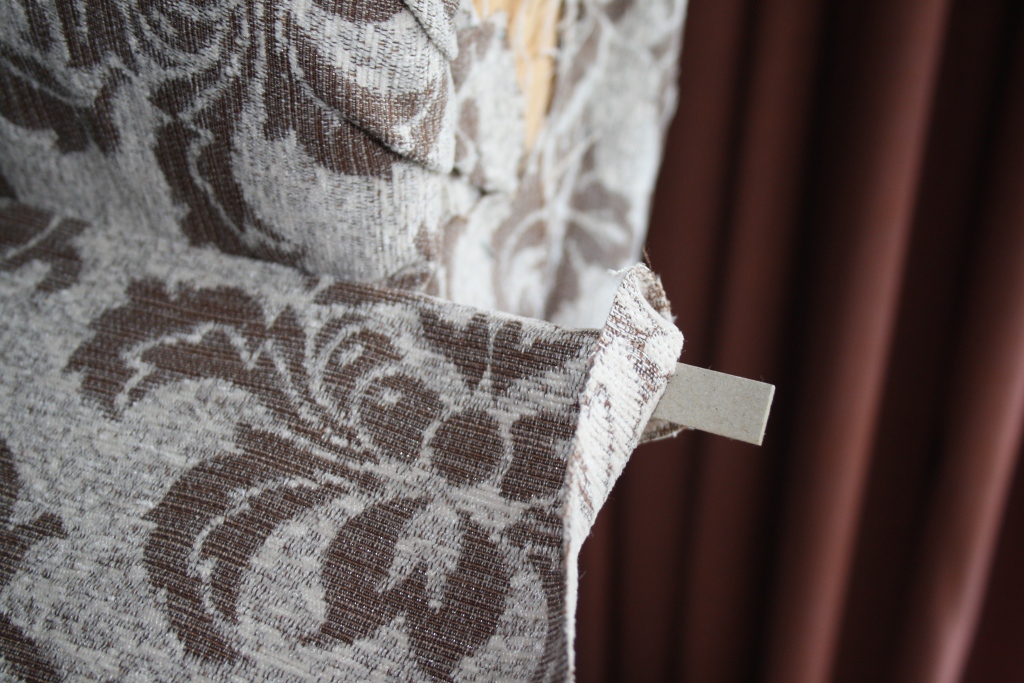
For the front, sides and back, In order to get a nice neat fold... You staple the fabric to hold in position, lay the cardboard strip on and staple it firmly.

Then fold the fabric back down and secure it at the bottom and sides..

I'm now working on my back piece

I'm nearly done!!!

I Can't wait til its finished... Its been so fun!!
I'm already stalking the streets for pick up days and second hand stores for my next project!


I have a three seater settee and two chairs that need doing too!!!! There is nothing wrong with the frame it's just the arms that have gone...I am not as confident as you to try and recover them. Linda
ReplyDeleteBy gosh, you are a clever girl! My dear Mum used to loe to upholster chairs! I've done a couple of simple ones, but yours is amazing!
ReplyDeleteGreat work Bec! I love how it is turning out!
ReplyDeleteAna
That guy didn't know who he was talking to!!!
ReplyDeleteIt looks fantastic, you should show him and let him know you'll be happy to help him if he ever stuffs it up lol
...well done!!!.I would see it finished,very very elegant,beautiful!.Show us others photos please!.
ReplyDeleteWow, Rebecca! That is amazing!
ReplyDeleteMy grandmother made soft furnishings for a living but I would have no idea how to go about re-upholstering a chair. Two things for sure (like you): I would research (including YouTube) and I would have to prove Mr Upholstery Shopman wrong!
You've done a wonderful job with the chair, it looks amazing
ReplyDeleteWow! You're doing FANTASTIC! I predict a lot of re-upholstering in your future.
ReplyDeleteIt is looking fantastic! I can't believe you have never done it before!
ReplyDeleteYou actually make it look like it can be done by anyone! Great job! I've got one that needs to be done, too!! Thanks for the inspiration!
ReplyDeleteDon't you just love the University of YouTube? I attend regularly! I admire your ambition!
ReplyDeleteYou did a awesome job recovering the chair...looks so professional.
ReplyDeleteLooks fantastic!!!! Does your mum want it back now???
ReplyDeleteI've done several small re-do's but nothing like a chair- that's a big project and I agree with the staples, they are everywhere. Must be the season for re-doing furniture, because once STASHTACULAR is over I will have my (small- compared to yours) upholstery post on my blog- I did a sewing chair for my daughter.
ReplyDeleteAwesome! I've watched many of those same videos and scoured the net for tips but have yet to take the plunge. It looks great!
ReplyDeleteLOVE IT!!!! That is always something that I have wanted to try. Now I need to find an old chair and go for it.
ReplyDeleteThanks for sharing!!!
It looks wonderful!!!!! You need to take pictures to that guy once it's all done!!!
ReplyDeleteBec, you did awesome!! It's not that hard, just tedious and nitpicky. You really need to take the upholstery guy pictures of your chair just to prove him wrong - maybe he'll hire you!!
ReplyDeleteIt looks nice! I love that fabric!!
ReplyDeletegreat job! love that youtube!
ReplyDeleteWish I was closer so you could help me with something like that!! Lots of staples!!! No kidding there. I like how they left the selvedge on the old fabric. So did you have enough fabric?
ReplyDeleteBeautiful Chair!!! I love the fabric you recovered it in. Great job!!
ReplyDeleteMy husband and I tried doing wingbacks and they did not end up half as good as your chair- it is AMAZING. Congrats.
ReplyDeleteI have been planning a project like that as well! Now I can look at your posts for tips along with the book I bought Thx!
ReplyDeleteYour chair looks great. Sounds like you needed a different project to stimulate your creativity. I spent yesterday on the floor pin basting. Took me longer than I thought. I used Fusiboo on my previous two quilts so this was the first time for pin basting. Another tutorial of yours helped me out.
ReplyDeleteThe summer before last my husband and I reupholstered our entire 10 year old living room set---two sofas and a chair. I spent $500 to get hotel grade stain resistant fabric and it was about a 2 week ordeal, but we did it and we get so many compliments on it still! Not to mention, my two kids smeared blue sunscreen on everything the week after we finished and it came right off. Thank goodness I sprung for the crazy stain resistant fabric or I would have just died. Awesome job on the chair! Can't wait to see the finished product. On a separate note, I finally got myself a walking foot---hurray!
ReplyDeleteYour chair looks great. I read www.designsponge.com and someone there is always redoing furniture and it is so inspiring.
ReplyDeletevery nice, i love it.
ReplyDeleteThe chair is looking great! Wonderful fabric choice!
ReplyDeleteBloody brilliant.
ReplyDeleteI hope you got the guy's email address so you can email him pics!!
x
You chose great fabric and it looks like an excellant job of bringing that chair back to life. And, yes, do you get to keep the chair or does it go back to your mom?
ReplyDeleteWow, that looks fab! If I were you, I'd take a photo and stuff it where the sun proverbially doesn't shine for that sales assistant ;o)
ReplyDeletewow, looks like a ton of work but it's looking so awesome! what pretty fabric too
ReplyDeletelooks fantastic, her mom is going to want back
ReplyDeleteWhoa, that is an intense project. Way to save the chair!!! I have a wing chair that needs new upholstery, but I was sure there was sewing (well, you have to sew the cushion cover with piping, right?). But, now I'm wondering if I can do it myself!?
ReplyDeleteWOW! What a great job you did! Thanks for sharing how you did it too!
ReplyDeleteHoly moly, you're doing an AMAZING job on reupholstering that chair, it looks GORGEOUS! Big kudos to you!
ReplyDeleteI am really impressed. Reupholstering is a tough job I know I would not be able to tackle. I love the detailed instructions you posted! Gives me hope. Oh, and love the gorgeous fabric!
ReplyDeleteHi, Bec - You did a super fantastic job!! I've got a chair out in my garage that was given to me.... right now it's in really crappy shape, but it's a good one to start a reupholstering passion with........ I just can't start it yet, as I'm just beginning my quilting passion..... I really need to figure out a way that I don't have to work outside the home so I can work on these passions!!
ReplyDeleteLove the fabric, too!!
Hugs ~~ Suz
inspiringcreativeness.blogspot
Hi - I commented already, but I Jodi at Pleasant Home just did this posting: http://www.pleasant-home.com/2011/08/sew-picture-perfect-sitting-on.html
ReplyDeleteCould this be a next project?!
Wow, what an amazing job!!! You are very good at reupholstering! If I were you, when it was completely done, I would take a picture of it and show the guy that was making fun. (you might then have to find a supplier for cardboard and metal strips).
ReplyDeleteWow, I'm totally impressed Becky! I have a chair I want reupholster and it's not NEARLY that involved. You just gave me the confidence to rip it apart.
ReplyDeleteOMG Rebecca this is wonderful and I love the fabric. I also have a chair that I have been afraid to tackle but you might have given me the confidence to do so now....thanks so much
ReplyDeleteAwesome tutorial Bec! How wonderful to SIT in a couch you upholstered yourself!! (Husband's help doesn't count ;)
ReplyDeleteawesome bec! this is SO cool!!!
ReplyDeleteHow about this ?Finished?I'm curious to see the final look !
ReplyDeleteThis looks fantastic! Great choice of fabrics, and you can definitely tell time and effort was put into it. Good luck with your next project!
ReplyDeleteHello Bec, i'm excited in doing a project since I saw yours! It looks great! I just wanted to share with you all about this series of videos I found of step-by-step in How To Reupholster A Wing Chair! I'm learning so much and I hope you will enjoy it as well! http://www.youtube.com/user/mjamsdenfurniture?feature=g-all-s#p/u/7/h1YPks4fvVg
ReplyDeleteHave fun,
Silvana
So how would you cover the front of the arms then? That is the part I would struggle with...
ReplyDeleteThe diy upholstery is shared con type post here. Read too know more
ReplyDelete