


I'm excited to introduce Kate from Kate Conklin Designs as the featured blogger for this week.
 |
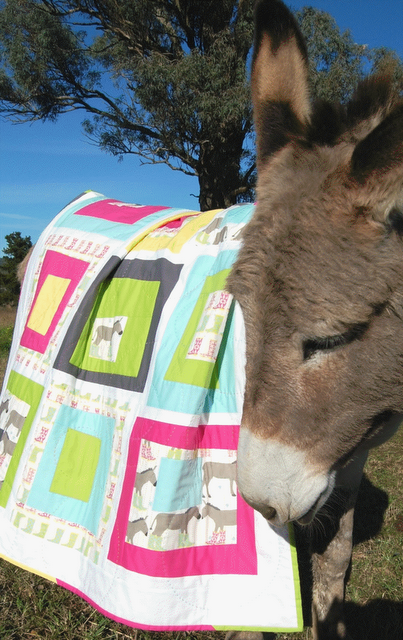
| Kate and her 'Extreme Quilting' |

Hi, I'm Kate, I love the "Stack and Slash" method of creating quilts. For those of you who aren't familiar with this term, it's basically where you stack up some fabric, make some cuts, move them around and sew them back together. It's fun, easy and gives a great improvisational look without cutting lots of individual strips or wasting fabric. I have used this method in many of my quilt patterns. It's actually what started me writing patterns. I felt that the "Stack and Slash" method hadn't been fully explored in modern quilt patterns and I had some fun ideas that I could share with others. Some of my patterns which employ this method of cutting and piecing are...


I wanted to share with you a really easy 'Stack and Slash' tutorial. This isn't one of my original designs - I've seen similar quilts around on the Internet, but it is my own method. It uses 8 Fat quarters of patterned fabric and 8 Fat quarters of solid fabric, and it's super easy.

I've used Cloud 9's Nature Walk range and a natural solid.

Using your rotary cutter and ruler, cut through the stack of fabric 7 times, so you have 8 strips. My strips were approximately 2 1/2" wide. Cut on a slight angle - about 1/2 inch difference from top to bottom. You can vary the angle and the width of the strips.

Now go to the strip next to it and move the top fabric to the bottom of its pile leaving a solid strip at the top.
From the third pile of strips, move the top 2 fabrics to the bottom of its pile.
From the fourth pile, move the top 3 fabrics to the bottom. Continue in this manner until all of the fabrics are represented at the top (as shown in the picture).


Take your other stack of 8 rectangles that you set aside earlier. Repeat the above instructions to make another 8 blocks, yielding 16 blocks altogether. Trim your blocks so they are all the same size (about 17 1/4" square).
Arrange your blocks by laying them on a flat surface (4 across and 4 down), alternating the first set of blocks with the second (see photo of the quilt). Move and rotate the blocks so that those in the first and third row start with a plain strip and the blocks in the second and fourth row start with a patterned strip. Move the blocks around until you are happy with the colour design and balance. Sew 4 blocks together across the row. Make a total of 4 rows, and then sew these rows together.

Thanks so much Becky, for having me on your blog!
See, I told you she was awesome!! I want to make one for a picnic rug....Thanks Kate!!

That's so clever. The quilts are beautifu and the technique clever. I'll be looking more at the others more closely.
ReplyDeleteWhat a great design!! I've got a friend who was looking at making a quilt similar to this - so this is very timely! I'm off to e-mail her the link!! Thanks for sharing and hosting, Bec!
ReplyDeleteThanks for the fantastic intro Becky! I just love that we've been able to enjoy this quilting journey together - right from the start, when we had no idea about quilting at all! Thank goodness for those free tickets :)
ReplyDeleteGENIUS! Thank you so much for sharing this technique!
ReplyDeleteIf nothing else, I love this post just for the fact that you have a 'Wonky Donkey' quilt actually on a donkey, ROFL
ReplyDeleteAnywho, I love the techniques. While I'm not a quilter, I think this technique would be fab to try on a pathwork skirt, will have to add it to my to do list :o)
Awesome! Must try this technique.
ReplyDeleteWhat a great technique and such awesome results. Got to try this one! THANKS!
ReplyDeletesuch a pretty quilt with a fun way of making it :) thanks for your tutorial!
ReplyDeleteWhat a great quilt. I am going to have to try her technique.
ReplyDeleteThanks for this, can I just check. When you cut the 2nd pile of fabrics do you need to cut them the same way as the first pile?
ReplyDeleteI love the tutorial. I am in the process of making There's a Square in There and having a great time. Just need to do the sashing and borders. I am enjoying the patterns from both of you. Keep it up.
ReplyDeleteGreat tutorial!! The first quilt I made was a stack'n'slash one - it was a great way to get started in quilting!
ReplyDeleteSuper Dooper that is great. My 2 favourite quilt designers in one place.
ReplyDeleteLucky you being related to Kate!!!
Love stack and slash! No one but us needs to know how easy it is!
ReplyDeleteOh! and I never knew how you two fabulous gals were related. That's fun!
ReplyDeleteSuch a neat trick! I think this should be a quick one to complete...a must try...thanks for the instructions!
ReplyDeleteI love Kate and all her designs! This is such a cool design. Thanks for sharing!
ReplyDeleteJennifer :)
Love this tutorial so much that I have featured it on my blog today. Thanks for sharing it!
ReplyDeleteThanks for sharing. I have posted about this tutorial on Freebies for Crafters...hope it was okay to use your photo...hugs Khris
ReplyDeleteI have been making quilts using this method for years esp. in my art quilts. When using only two fabrics you can get a great postive/negative piece.
ReplyDeleteGreat post. Love all of the quilts and will surely try the tutorial! Thanks!!
ReplyDeletefantastic quilt! Am going to try it with some batiks I have just bought..
ReplyDeleteThanks for a great tutorial!
ReplyDelete