Tuesday, October 18, 2011

Hello Quilt & Sewing Addicts,

I guess from the introduction you can tell this blog post is not from Bec..... Hi its her husband Trav and I've decided without her knowledge to do a blog post for her as she has been unable to herself and is consistently worried about neglecting her online friends.

As you may or may not know Becci is 8 weeks pregnant and we are full of excitement, trepidation, gratitude and faith. It is for this very reason that she has not been able to blog as she has been very ill with morning sickness. Now traditionally most women suffer from some form of nausea during pregnancy. So when someone says to me " How's Bec?" and I say "She's pretty sick with morning sickness" I always get a response like:

"Oh yeah I remember what that was like for me, I used to feel sick in the mornings when I was on my way to work, or the gym, out at the shops or doing the washing it was so annoying."

Well I thought I'd take the opportunity to set the record straight and whinge on Bec's behalf. This is no normal morning sickness. I would imagine that maybe only 10% of women who get pregnant actually feel this sick. And I like to think since this is the fourth time around I'm a bit of an expert in determining the difference between morning sickness and what I call:

 "24/7 - 24 week - Throw up Marathon"

If you can answer yes to the following 11 questions you might graduate for this exclusive club:

1. Does your nausea last all day and no matter what you take it can never be suppressed??
2. During the night is your nausea and the need to throw up waiting for as soon as you wake up like a stalker who's been watching you sleep??
3. Do you throw up at least once every hour while you're awake??
4. Do you continually crave Carbs even though the natropath you're trying this time around forbids you from eating them and prescribes everything that makes you gag to be a part of your daily diet??
5. Does motion of any kind ( Even rolling from one side to the other in bed or on the lounge because you're numb ) intensify your nausea 10 fold.
6. Have you ever answered a knock at the door to a dear friend and found yourself Standing, leaning, sliding down the door frame and then laying on the floor to keep the nausea at bay while you talk because otherwise you'll throw up on the front door mat??
7. A Continuation of question 6...... Does having your body at an angle greater than 45 degrees cause you to throw up??
8. Do you have to eat at exact the right time to appease the ravenous crazy beast that is your stomach otherwise it turns on you and no matter what you eat after you've missed your window of opportunity is literally thrown back immediately??
9. Has the only exercise you've had over a period of three weeks been walking to the shower once a day??
10. Have you ever been stuck at home for a period longer than 3 weeks??
11. When someone says to you 4 year old daughter "What did mummy do today?" Did she respond in this manner?? "Mummy just lays really still all day and moans: I'M SOOO SICK!!

If you were able to answer these questions affirmatively then you qualify ..........
YOU POOR WOMAN!!!

Basically the real distinction between morning sickness and what Bec gets is that if you can manage to do all the things you'd normally do and just feel a little off then it's morning sickness.
If you find yourself completely debilitated and your life as you know it ceases for a period of nearly 6 months like a cruel time warp..... Then you'll know how Becci feels.

Seriously though hang in there for her. After the first month hits like a ton of bricks she can normally adjust and muster up the strength to get back to some of the things she loves.

Ahhhh.......The natural process of pregnancy and child birth.......

Not long now girls....... I'm sure you'll hear from her soon.

PS..... On a side note. I've attempted in my new role as temporary mum to keep the house as well kept and orderly as it normally is........ the work NEVER stops!!!!!
I've been constantly cooking and cleaning and washing amidst working and then I wake up and it's all dirty again and everyone's hungry again. I have a HUGE appreciation for the work that mothers do. Any husband who thinks he makes up more than the 50% of the workload in his marriage should do there job for a week.........  It'll set him straight.

Trav



signature

Wednesday, October 5, 2011

Circle of Geese Block tutorial....

Hey Everyone!! I have missed you... I have been FLAT out this week! Literally...!! Ill explain later...
But for today... I am so excited to Introduce Cara to you!! She is a super Mum! She has put an amazing Tute together for us... The Circle of Geese Block.. I have absolutely NO IDEA how to make this block so i jumped up and down when she said she would share this with us..... Thanks Cara... xx

Hello Chasing Cotton readers!  I'm Cara from Me? A Mom? and I'm so honored Bec asked me to come over and teach you all a block.
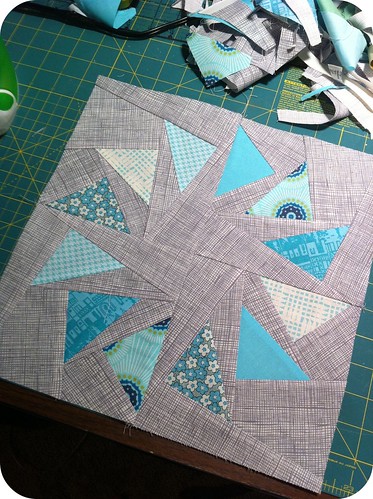
circle of geese block
Today I'm going to show you how to successfully sew a Circle of Geese block without hurling your scissors across the room or pulling out your hair. This is one of those blocks that can intimidate many but trust me when I say if I can do it, you can do it.

This is a paper-pieced block which means you stitch your fabric onto a piece of paper following the lines that are pre-printed on the paper. And it really is that easy once you get the knack of it. This block is a lot like learning how to ride a bike. It might be hard at first but, once you learn it, you wonder how you ever struggled.

The trickiest part of assembling this block, in my opinion, is that it involves lots of turning and flipping and folding back of fabric and paper pieces. It's easy to get confused and make mistakes so this tutorial has a ton of pictures.

This tutorial also involves some extra steps to help you avoid issues. As you get more comfortable with how to assemble the block, you can cut out some of the extra steps. Or you can throw caution to the wind and just skip them all together from the get go.

Okay, so let's get started.

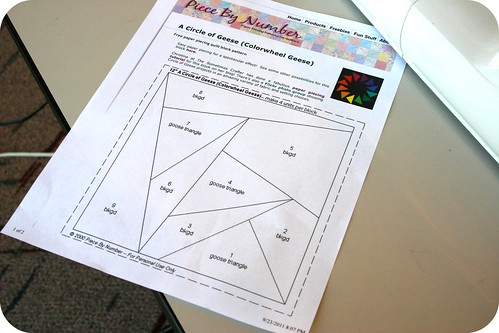
First you need the template. I like to use this one. (Note: sometimes that link doesn't work for whatever reason. If that's the case for you, go to http://www.piecebynumber.com/and go to the freebie tab. Look under geometric and you'll see the circle of geese block.) When you print it out, make sure it's printing full scale and not being scaled down. I had to decrease my margins to get it to properly fit on one page.  You'll need four copies for each block. Print out a few extras to have on hand.
Piece by Number template
Next, cut it out ALONG the dotted line. This will be the finished size of your block section and you'll use the edge of the paper as your trim line when you are finished, so cut it out neatly and accurately.

As you'll see, the sections of this template are numbered. Throughout this tutorial, I'll be referencing these pieces by their number (#1, #2, #3, etc).

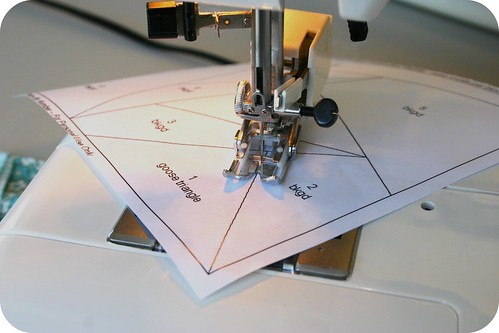
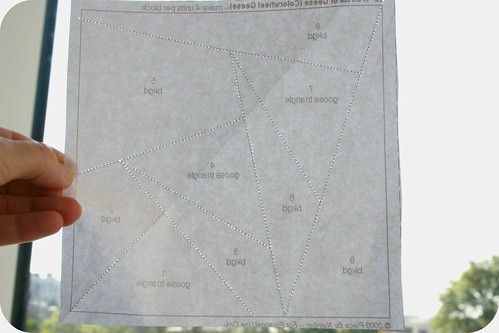
Because you will eventually be tearing the paper off from the fabric, I highly recommend perforating the lines on the paper before you begin sewing. To do this, simply stitch along all the inside lines without thread in your needle. IMPORTANT: set your stitch length to the smallest setting so that your stitches -- or in this case, the holes -- are close together.
Perforate the paperPerforated!The other nice thing about perforating the lines in advance is that it's handy for when you need to fold back the paper along the lines. And in this tutorial, you'll be doing that a lot.

Okay, next step.

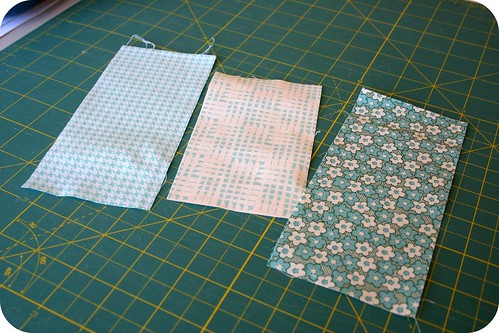
Cut out fabric for your background pieces and fabric for your goose triangle pieces. I find 3" x 5" is a good size; you can go smaller as you get more comfortable but I like to give myself room for error. The first few times you assemble this block, it's helpful to start with larger cuts of fabric. Most of my early mistakes involved using a piece that I swore was big enough but after sewing and turning it, it would be too short. Trust me when I say you'd rather have some fabric waste than the frustration of having to unpick a section because it ended up being a few millimeters short.
For triangle pieces
For my goose triangles.

Size of fabric for background pieces
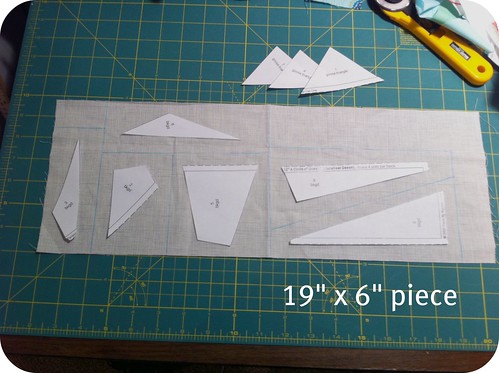
If fabric waste is a concern, a 19" x 6" piece will fit all six background pieces.
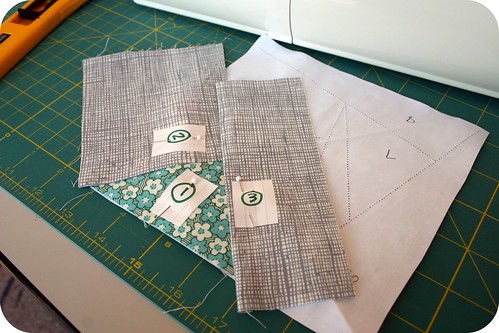
Alright, now grab your paper template. You will use the numbers on the paper template as your guide for where to start and where to go next. We'll work in numerical order, so your first stitched line will be the line between #1 (goose triangle) and #2 (bkgd).
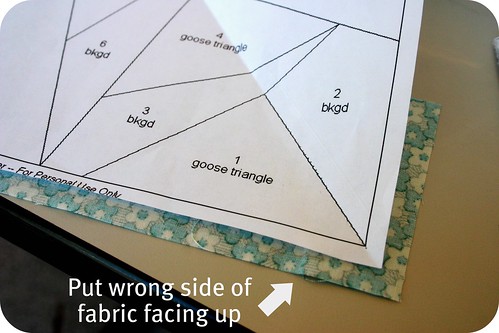
Take the fabric piece for your first goose triangle and lay it with the wrong side facing up (right side facing down). Place your template on top of the fabric with the words facing up.
1
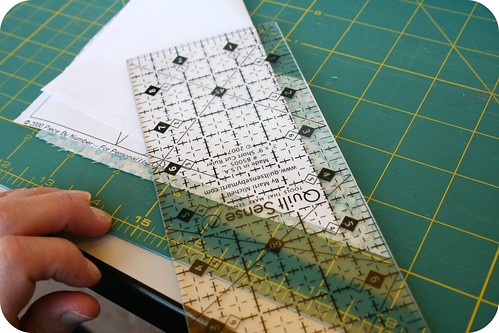
Fold the paper template together at the line between #1 and #2 and -- using the edge created by the fold as a guide, trim the fabric to leave what will be a 1/2" seam allowance. (As you get better at this block and need less room for error, you can trim it to 1/4" instead.)
2
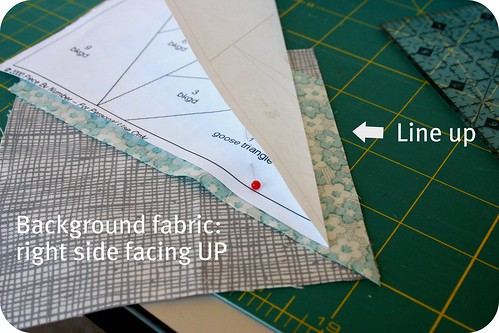
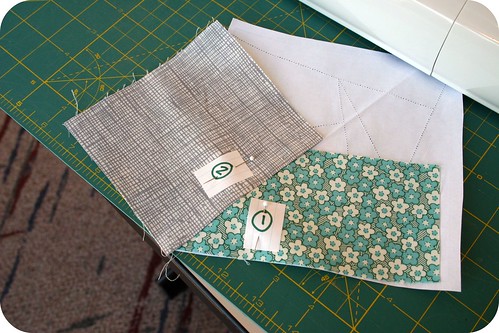
Now you are ready to position the fabric for #2. I know, I know, when are we going to start stitching, right? Hang with me. Place the background fabric (#2) right side facing up under the #1 fabric. Line them up as noted on the photo below and pin.
4
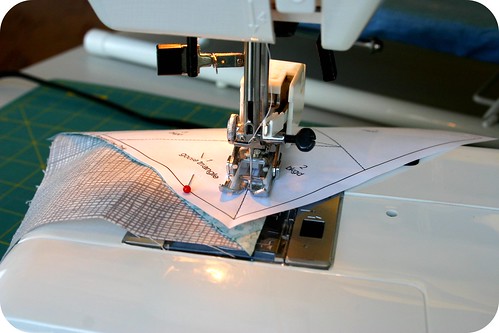
Let's stitch! Fold your paper flat again and stitch along the line between #1 and #2.
5
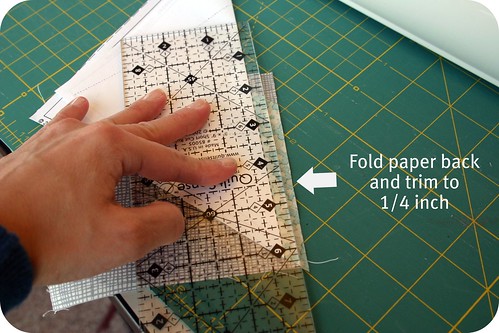
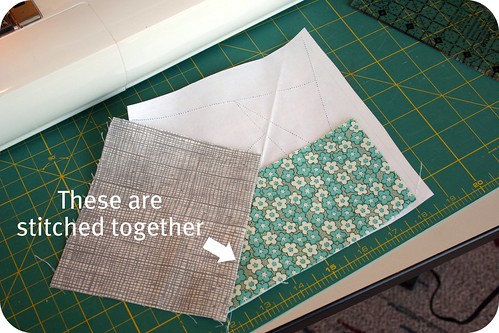
After you are finished stitching, fold the paper back again at the line between #1 and #2 and use the edge of the paper to trim the fabric to 1/4 inch seam allowance. Like I said, you can skip this step obviously if you initially trimmed to 1/4 inch seam allowance in the previous step.
6
Now turn the paper over and press your fabrics open.
7
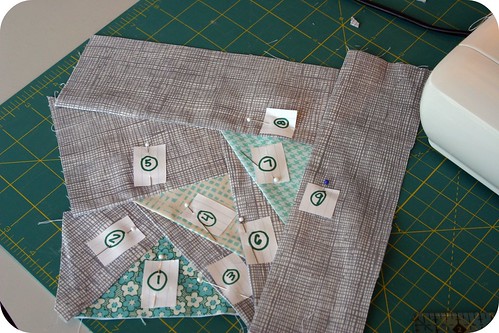
Okay, now from here on out on this tutorial, my photos are going to show the pieces labeled so that you don't get confused. You don't have to do this at home, though I do find it helpful to write the numbers on the back of the paper.
8
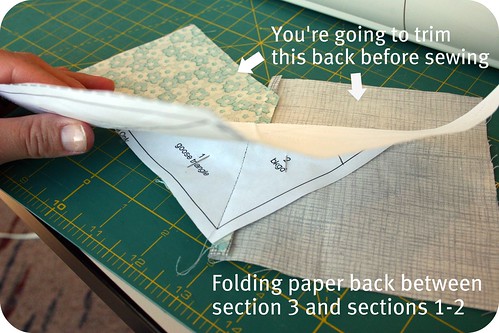
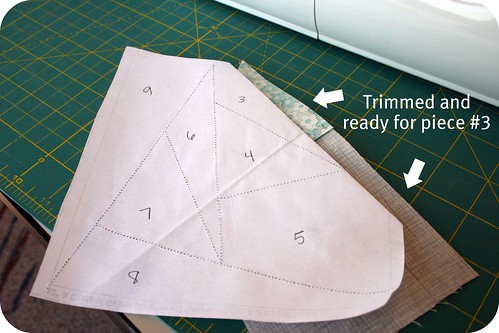
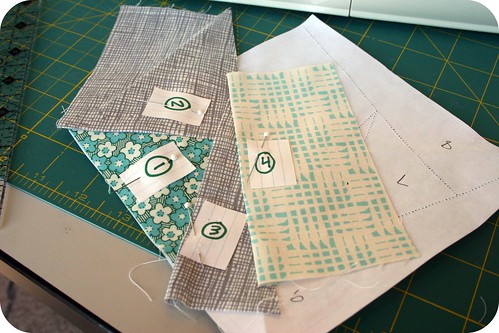
Okay, now you're ready to move onto #3, a background piece. Place your sewn pieces right side down and fold your paper along the line between #3 and #1-#2. Go ahead and trim (leaving either 1/4" or 1/2").
9
Now you're ready to place and sew piece #3.
10
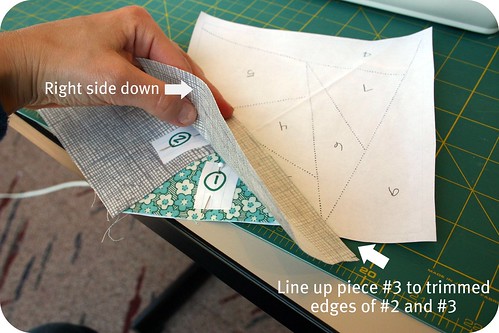
You can either slip piece #3 under the #1, #2 pieces or flip the block over and place piece #3 on top of pieces #1 and #2 (like in the picture below). Which ever way you pick, just be sure your fabrics are right sides together.
11
Stitch along the line between #3 and #1-#2.  Turn paper over and press fabrics open.
13
Next you'll turn your paper over so the fabric is right side down. Fold back the paper along the line between #3 and #4. Continue to repeat the same previous steps of trimming, lining up the next fabric piece, pinning, folding the paper flat, stitching, and ironing the fabric open.
14
Are you getting the hang of it? Go ahead and finish up #5, #6, #7, #8 and #9 following the same steps as above. Just remember to go in sequential order.
almost done!

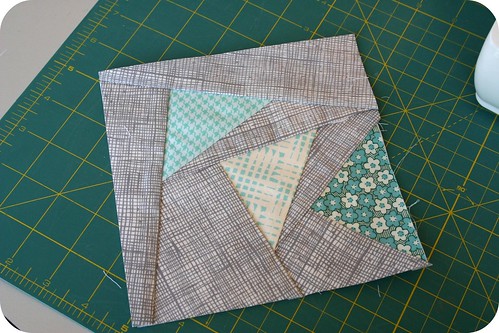
Almost done! Time to trim. Use the paper as your guide and trim to the paper. If you are trimming paper off, you are trimming too much.  (Sorry, I forgot to get a shot of what the block looks like on the back before trimming.)
Trimmed
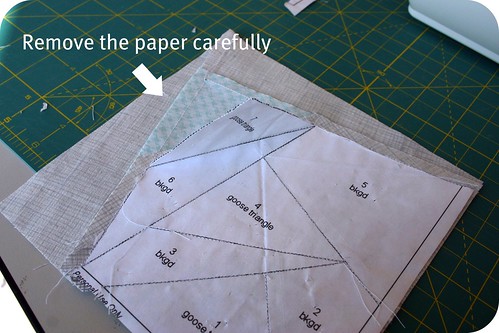
When you are ready, carefully remove the paper. I find that it helps to start with removing #9 and working backwards (#8, #7, #6, etc.).
almost done
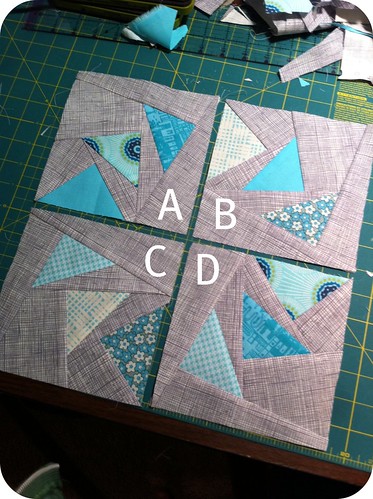
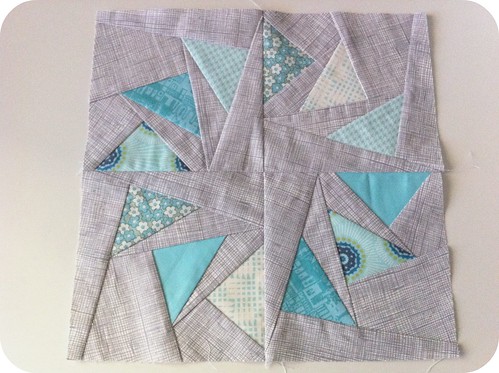
Once you have four sections completed, you are ready to arrange them and sew them together.Sew A to B and set aside.  Sew C to D and set aside.  Then sew AB to CD and you're done!
Figure out your layout
Ta-da! Aren't you fancy!!
finished
Hopefully, I've been able to demystified the Circle of Geese block for you and you're not cursing my name right now. Happy sewing!!  Feel free to come over to my blog and say hello!

Thanks sooooooooooooooooooo Much Cara!!! xx Mystery solved!! xx I hope you enjoyed her Tute... I did! xx

Thursday, September 29, 2011

Quilt Class 101 - the Log Cabin

Hey all! How are you doing? I'm Kaye from Miss Print and I'm here today with a little tutorial for her Quilt Class 101 series. I'm creating a traditional log cabin block - according to Bec I am the queen of log cabins...who knew?! Today we will be creating a 12" log cabin block (12.5" when unfinished) that has three ; I hope you guys all like this tutorial!
What you'll need:
3.5x3.5" piece of fabric for centre square - go ahead and fussy cut something really cute for this!
Scraps of fabric each 2" in width

All seams are 1/4"
Here are your strip measurements - remember each strip is 2" wide:
For inner ring (i.e. right next to the centre square): one 3.5", two 5", one 6.5"
For middle ring: one 6.5", two 8", one 9.5"
For outer ring: one 9.5", two 11", one 12.5"

The Inner Ring:
Starting with your 3.5" strip sew, rights sides together, to the top of the centre square. Press your seams open. I like to press my seams open when sewing log cabins because of the multitude of seams and intersections.
Next sew a 5" strip, right sides together to the right side, of your centre square. Press.
Sew the second 5" strip, right sides together, to the bottom of the centre square. Press.
Sew the 6.5" strips, right sides together, to the left side of the centre square. Press.

The Middle Ring:
Continue adding the strips for your middle ring, as above, working in a clockwise direction beginning with the top strip - this would be a 6.5" strip, then an 8" strip, then the second 8" strip, and finally the 9.5" strip. Remember to press after adding each strip.

The Outer Ring:
Just as with the previous step, continue to add the strips for your outer ring moving in a clockwise fashion beginning with the top strip - this would be the 9.5" strip, then the 11" strip, then the other 11" strip, and finally the 12.5" strip. Remember to press after adding each strip.
Look at that - you're done! If you like continue making more log cabins - 36 blocks sewn together in 6x6 block grid will form a 72x72" quilt which is just perfect for snuggling under!

Thanks so much to Bec for inviting me over today and to all of you for reading along here. I really hope that y'all enjoyed my tutorial and don't be afraid to stop on over to my blog and say hi!

Thanks so much Kaye.. She is the Queen of the log cabin!! I just LOVE her blog and her inspiration!  She has made a couple cute tutorial variations of the log cabin HERE ..
and
for more Quilt Block Tutorials or Tutorials on How To Make A Quilt... You can Find them HERE... 
I hope your enjoying the class!! xx
signature

Saturday, September 24, 2011

What am I working on...?

........... Another Quilt Of course!!!

Using up my lovely little bundle of Heather Ross' FFAIII collection.
signature

Wednesday, September 21, 2011

Quilt Class 101 - Friendship Star Block Tutorial

First of all thanks to Bec for sharing her readers with us today!  We love her creativity and we're excited to be a part of her great Quilt Class 101!!

Let me tell you a little about us.  We are sisters, Heather and Megan, together we design quilt patterns and run our blog!  In our patterns, found HERE, we like to use traditional piecing with modern fabrics and twists!  We've also got a thing for applique :)  We are constantly designing new patterns...we both admit that more nights than not it's how we fall asleep.  Such is the life of fabric lovers, right??
Our blog is Quilt Story.  About three times a week we feature YOU!  That's right, we feature other blogger's finished quilts and the stories behind them.  See HERE to learn more about being featured.  We featured Bec's Sand Castle Quilt a while back :)  Also every Tuesday we have a linky party called Fabric Tuesday, it is tons of fun where you can link your own fabric projects and see what other's are up to.  Not to mention that Megan and I share our own projects on the site too!!!
We've got a block tutorial to share with you today, Friendship Star:


Cutting requirements
see image below
Solid background: two 4.25" x 4.25" squares for HST and four 3.5" x 3.5"
Contrasting pinwheel: two 4.25" x 4.25" squares for HST
Center: one 3.5" x 3.5"

HST (half-square triangle)

Draw a line from corner to corner on both solid background pieces.

Sew 1/4 inch on each side of the pencil line, then cut down the pencil line.

Square the HST's to 3.5"

Piece together in rows first, always using 1/4" seams

Then sew rows together!
Voila!  One 9.5" x 9.5" finished block

Thanks for letting us share with you today!!  Make sure to stop by and see us at Quilt Story.   We've got more block tutorials and quilt tutorials to share!
Photobucket


Thanks so much Girls... I'm envying your fabric choices! I LOVE LOVE LOVE those bikes... and great Dots!!
 
On a side note, Have any of you been following Madame Samm's Extravaganza over at Sew WE Quilt??  She is running a massive Wantobe Quilter Campaign and this Wednesday...(USA time not Aussie Time) I'm being featured! Pop over HERE and check it out... Make sure you enter the giveaways... she has a HUGE list of Amazing Giveaways!! xx

Saturday, September 17, 2011

Sewing with Kids

Making a Softie...
I have had this really cute Softie sitting in my cupboard waiting to make. I had told Indi it would be a project that 'she' could make.. so this week when we had a free day, she remembered and said she wanted to do some sewing... How could i say no to that!

As simple as they are... I have never made one before. I watched a Quick how to vid on Saffron's Blog, You can see it HERE... I took photos for you, of our progress so you will know in the future how to make one.. and.... I also like cute photos of Indi's pudgy hands.
Super easy and really fun with kids.
How to make a Softie...?
Cut out your softie panel on the dotted line.
With right sides together... Pin all around the edge.. Make sure they are lined up properly.
Sew on the outline of your softie,  remember to leave an opening. As per Saffron instructions, we left the opening on the neck. Indi sat on my lap as we sewed this part. I did the pedal and she lifted the foot, turned the puppy and put the foot down. Got her hands in place and guided the puppy through..
She did a pretty good job.. Maybe we have a quilter in the family!!
 Clip on the drawn lines around the legs.
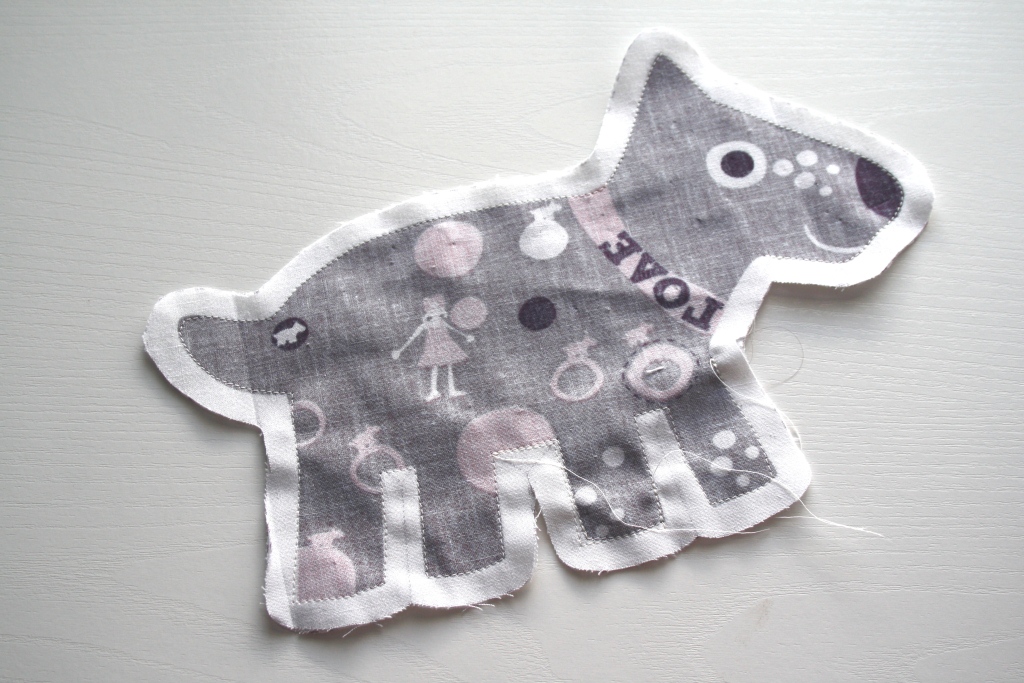
Turn your puppy in the right way and stuff!
We added a bell in ours!
Sew up your opening!
All the
way to
the bottom
to
finish it off..
Now... Pose!

     and Your DONE!!
 It was really fun.
 I was surprised how good she did.. I think I've found  her new day job.....  sewing bindings!! I'm not the first to do child labour right??
It probably took us an hour and a half. If you were doing it yourself maybe 20 Mins?  Saffron has some really cute Softies.. Dogs, Cats....
Owls and Koalas!
They are great for pressies or as holiday projects. You can buy them HERE....
Enjoy your Weekend! We're off to a Soccer Party! xx
signature

LinkWithin

Related Posts Plugin for WordPress, Blogger...